Featuring Premium Parts from
by Scott Ammerman
Quadratec Channel Correspondent
If you own TJ-edition Wrangler, and have spent a bit of time in the woods, then you have probably noticed some of the drawbacks from its factory fenders.
Even an incidental impact against a smaller object can leave the flares crumpled, and they could even be ripped off on tighter trails quite easily—possibly by your own tires if you have a lift with any flex.
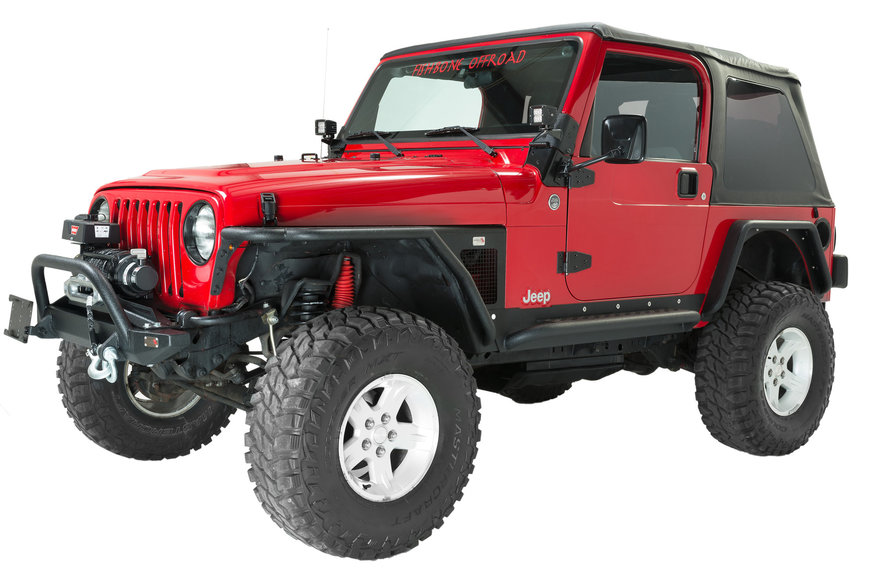
So if you have been looking at replacing those factory fenders, then Fishbone Offroad has you covered with its front and rear Fishbone Tube Fenders.
In addition to being far more durable than the factory plastic flares, the Fishbone editions have a classic high clearance flat fender look. The front fenders also incorporate a mesh panel for additional heat dissipation during the hotter months.
One important not on these flares: cutting and drilling into your Jeep are required for installation, so this is an above average installation. It took two of us several hours to complete, with the front fender replacements taking up most of that time. The rear flares merely required making the mounting holes a little bigger, so those were a much quicker installation.
.jpg)
Meanwhile, the Fishbone sliders are a rather simple installation by comparison, but they do also require drilling. These sliders are held in by two rear body mounts, as well as five holes drilled through the side of the Jeep into the passenger compartment.

Your factory fenders do have front turn signals and marker lights installed up in the fenders as well, and those will need to be relocated. Fishbone sells a ¾-inch, three-wire amber LED kit for this application that fits right into a small spot on the fenders.


For fender flare part of this install, my buddy Alex and I opted to take an additional custom step and modify the front grille to accept JK Wrangler turn signals with a smoke cover finish. This is actually quite simple to accomplish with a few additional tools, and the bulb holders from your original signals work fine with the JK lights, so no wiring modification is necessary.
For the JK factory turn signal modification, you will need:
- A 3 ⅛” hole saw and arbor
- ¼” drill bit
- A fairly powerful drill (I used a ½” chuck Ryobi brushless hammer drill)
- Touch up paint
- A deburring tool
- A die grinder or file to remove some plastic from the JK lights
- Amber colored 3157 bulbs if using smoked lenses (the JK ones won’t work in TJ sockets)
Tools you will need for Fishbone Offroad Front and Rear Tube Fender Installation:
- A drill with 5/16” and ¼” and ⅜” bits
- A reciprocating saw and metal cutting blade
- A cut off wheel on a die grinder or angle grinder
- A sharp pair of tin snips (optional, but we found them helpful for small cuts)
- 13mm deep and shallow socket, 13mm box end wrench
- 10mm socket and wrench
- #2 Phillips head screwdriver to remove factory turn signals
- 4mm allen socket or key
- A pair of channel locks or pliers to grab plastic fender nuts
- Brushable touch up paint
- Rust inhibiting spray paint for cut edges
- Black RTV
- A center punch and deburring tool are recommended, but not totally required
- Scissors and tape
- Permanent marker or paint pen (depending upon the color of your Jeep)
- A utility knife
- Bungee cords (to hold factory wiring away from the cut zone)
For the Fishbone Rock Sliders you will need:
- 16mm socket to remove body mount bolts
- 17mm socket or wrench for installation of new slider hardware
- 6mm allen socket or key
- A drill with a ⅜” drill bit
- A floor jack capable of getting close to the underside of your body tub
- A 4x4 wood block and cushion for the top (we used a folded up rag)
Procedure for signal relocation:

First, use the Phillips head screwdriver to remove the factory turn signals, and pry out the two fir tree cable ties holding them to the inner fender. Pull the entire harness out of the way.

Note the difference in bulb sockets, the TJ unit is on the right, JK on the left. We are reusing the TJ sockets in the JK lights. The wiring plug is not the same on the JK sockets.
Because we’re using smoked-style later model JK lights, the bulb in the JK socket is amber. This bulb will NOT fit in the TJ style socket—if you are using amber JK signals, you can use the clear bulb from your original signals in the new light. If you are using the later style lights, then grab a set of 3157A bulbs prior to installation.

Measure where you want the lights, then center punch both sides. It does become a lot harder to measure the second one with a huge hole, so do both side ¼” pilot holes at the same time and verify proper placement. On our installation, we had to be careful not to interfere with the front bull bar as we drilled with the hole saw, so that influenced placement.

Set up the hole saw on the drill with the arbor.

Drill both sides with drill set on lower speed, with the arbor centered in the pilot hole. Keep in mind that a hole saw usually has very aggressive teeth, so do your best to keep it straight as it cuts—it may try to twist when it first bites all the way through.

De-burr the edge with a hook type deburring tool, or a rounded edge file. Then paint the edges with touch up paint and allow to dry.

Once the paint has dried to the touch, route the wires back through that hole in the inner fender, pulling them far enough to have the connector outside the hole you just cut. Please be careful with your wrists on the sharp metal edges.
After this step, you are ready to plug in the JK lights, but the three indexing tabs around the outside edges must be ground down to allow the light to fully seat in the TJ grille.
Grind each tab almost all the way down before test fitting, then slowly remove the last little bits, checking every so often until they stay snugly in place. If you do get them most of the way in and find you need to remove, then a plastic pry tool will allow you to get them back out by gently prying around the perimeter.

After this, remove your factory fender flares with a 10mm wrench (ratcheting wrench is a definite plus) and a pair of pliers behind, as the hardware uses plastic nuts behind the fender metal.


The three bolts towards the rear of the wheel arch may be a pain, as often times the welded nuts break loose when you try to remove the bolts. If you don’t want to save your factory flares, you should be able to pull them rearwards and the plastic will tear enough to go over the bolt heads. This section of fender will be cut out anyway, so you really aren’t doing anything but saving yourself time.

The plastic flare extensions behind the fenders also need to be removed for installation, and you can use the same 10mm for this.

Now it's time for arts and crafts.
Cut out the templates from the four pages of the instructions and tape them together. If you are all alone on this installation, or it is windy where you are, you may want to trace this template on a piece of cardboard. We had no problems with two sets of hands holding everything still to mark the fender for cutting.

Tie all wiring in the cut area out of the way using a bungee cord.
Start cutting with the reciprocating saw from the front, following the line you traced from the template, until you reach half of the fender. Unbolt the front part of the fender using a 13mm socket.

Continue cutting with a cut off wheel toward the rear of the fender, about 1” inboard of the face of the fender—slightly further in than this picture shows.

Test fit the Fishbone front fender, and if everything seems to line up then paint all cut edges to prevent rust.

For passenger side installation, it is a good idea to remove your battery. While it might be possible to cut around the thing, slicing into the soft plastic case of your battery with a reciprocating saw would be a pretty poor way to spend your day. Removal only takes a few minutes, and is cheap insurance. Follow the same instructions from the driver’s side.
While the touch up paint on the cut edges is drying, install the Fishbone Offroad fender on the driver’s side.
Using the factory bolts and a 13mm socket, loosely attach the front section of the bumper, then move on to the rear. There isn’t a whole lot of room to work in the rear section, so a shorter-handled ratchet would be ideal.

Tighten the four bolts inside the fender facing forward near the tire.
You are now ready to drill the top bolts through the remaining factory sheet metal.

Using a ¼-inch bit, drill through the metal using the Fishbone fender as a guide.

Use touch up paint on all drilled surfaces.

Use the 4mm Allen key and 10mm wrench to install the supplied bolt, washers and nylon locking nuts.
Use the 5/16” and ¼” drill bits to drill up through the fender support where the hood latch was bolted through on the factory fender, also touch these holes up with touch up paint.

Although not included in the instructions, it is probably a good idea to drill extra ⅜” holes for the factory hood bumper, to keep it from rubbing on the metal of the fenders when held closed.

You are now finished with the installation of the front Fishbone Offroad fenders.
The rear fenders are much easier, and can be installed in a few minutes.
Remove the factory fenders using a 10mm wrench.

Mark the holes that need to be enlarged for the Fishbone Offroad rear fenders by holding the fender up to the body and using it as a guide—mark with a permanent marker. If you don’t see holes through the fender, you may have the wrong side (they do look very similar). One of the holes has a nutsert, and you can’t get your hand behind that location so do not drill this one out. You will reuse the factory bolts.

Drill holes using the ¼” drill bit, then deburr and touch up the drilled holes to prevent rust.

Once the holes have been enlarged, use the supplied hardware to mount the rear fenders to the body. A 4mm Allen key and 10mm wrench will be used for this task.

This is the one spot where the factory shoulder bolt was reused.

Take a step back now and admire your work—the rear Fishbone Offroad flares are installed. Didn’t I tell you they were easier to put on than the front ones?
Now, for the sliders, you’re going to need a floor jack and a wood block. First we will use it to lift the body off for the slider to be put into place between the body and the body mounts.
Using a 16mm socket, remove the two rearward body mount bolts. These are long, so an impact wrench isn’t a bad idea if you have one available.
Using the floor jack and wood block (and some type of padding above it) lift up the body enough to create a gap between the body mount and body; enough to slide the sliders in place.

Loosely thread the body mount bolts in place to keep the slider from moving too much forward or backward, and push the slider against the body tub.
Lower the jack and reposition it below the slider, holding its weight against the body so you can drill mounting holes.

Pull the inner carpet away from the sill of the body tub. Drill all 5 mounting holes out with a ⅜” drill bit, keeping in mind the front mounting bolt will be going through your new fender. Use touch up paint on the holes to prevent rust.
Use a 17mm wrench and 6mm Allen key to install the new hardware. The rearmost bolt can be tricky, and we had to ‘clearance’ the body metal with the round end of a ball peen hammer a bit to allow space for the washer.

For Alex’s installation, we were able to use his Quadratec QR3 Heavy Duty Side Steps with the Fishbone sliders with no step. He likes these because they allow his kids to get in the Jeep all by themselves.
He is very happy with the way his trusty TJ turned out, and they perfectly match his Fishbone Offroad front and rear bumpers.