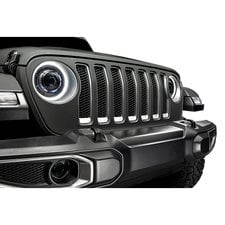
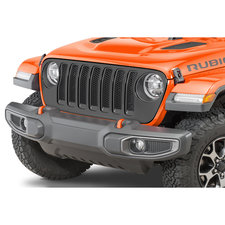
Hey Rob here for Quadratec.com. Today we're checking out the heated version of the Oracle Oculus nine inch Bi-LED projector style headlight for the Jeep Wrangler JL and the Jeep Gladiator JT. Oracle offers the Oculus headlight in a couple of different versions for you. You can choose from the standard version which does offer a couple of different color choices for the bezel and for the DRL LED halo ring. You also have the color shift version of the headlight with multiple RGB controlled color zones on the headlight for a high level of personalization. You can get more information on both of those versions of the Oculus headlight by clicking the info button to watch those videos. Today we're taking a look at the heated version of the Oculus headlight with the built-in heating element. This adds an additional layer of safety and convenience to the headlight especially during winter driving conditions. Most LED headlights simply do not produce enough heat to melt away any snow or ice that could accumulate on the lens. Of course when that starts to build up it's going to diminish the amount of light output from your headlight. With the built-in heating element and automatic temperature sensor when the temperature drops low enough it's going to turn on that heating element to help melt away any snow or ice that has built up on the lens of your headlight and prevent additional snow and ice from accumulating so you always have the maximum amount of light output from your Oculus headlight. Now speaking of those output numbers the Oculus is a Bi-LED projector style headlight that means we have a single projector lens in the center of the headlight with an LED light source behind it and there is a mechanical shutter to switch between low and high beam. On low beam you're going to be outputting 3200 lumens of light with a super sharp cut off that's going to keep that usable light down low on the road and off to the side hopefully helping not to blind any oncoming traffic. Now when you switch to high beam that mechanical shutter is going to lift allowing the full output of 5200 lumens of light down farther the road and up higher so that you can see any potential hazards much sooner. The Oracle Oculus headlight does utilize both passive and active cooling methods to help keep the LED chips at the appropriate and optimum operating temperature for the longest life span with built-in heat sinks and a mechanical fan to help keep them running cool. This light housing is a nine inch housing designed to be a direct replacement for your factory housing in both the 2018 and newer Jeep Wrangler JL as well as the 20 newer Jeep Gladiator JT. If we flip it over we see it is a fully sealed unit and it does feature a plug and play style connector that matches your vehicle's headlight connectors for an easy install. We do have one other weatherproof style connection here on the back of the headlight and that's going to be for the DRL LED halo ring. Now that will require the use of the included standalone wiring harness that is a very simple install. It simply runs to the vehicle's fuse box using a fuse tap for automatic control of that DRL LED halo ring. As I also mentioned that heating element is controlled by the automatic temperature sensor and because of that there's no additional wiring you need to install or switches to operate that heating element. The heated version of the Oculus headlight installs exactly the same as the original version of the Oculus headlight that I installed in my Gladiator just a short while back and I'm going to show you how easy that install was right now. The first step is to go ahead and get the grille off of our Jeep and if you need to know how to do that you can click the info button to watch our Quadratec Academy video we put together showing you step by step how easy it is to remove the grille from your Wrangler or your Gladiator. It simply involves removing a couple clips along the top edge and then pulling along the bottom to remove some of the pressure clips. Now at this point here we can go ahead and remove both the driver and passenger side headlight. Now each headlight is held in place with three 10-millimeter bolts. There are two on the inside edge of the headlight one at the top and one at the bottom and one on the outside at the top of the headlight just near the hood latch here. So we grab our 10-millimeter socket I like to use an extension just to give us a little better access here we can go ahead and get these out of the way. Now we can go ahead and remove the headlight from the grille. Bring it out and disconnect the electrical connection to the back by depressing the tab and pulling back. With the driver side headlight out of the way now we can go ahead and repeat the same steps to get the passenger side headlight out. So as I mentioned before, the Oracle Oculus headlights are a plug and play headlight that use the factory headlight connection, however we do need to run the included wire harness that's going to supply power to those DRL halo rings. Now the harness has a ring terminal on one end for ground and our positive lead we're going to come back to that in just a few minutes and at the other end of the harness we can see we have two legs. We have a short leg and we have a long leg. Now the short terminal is going to stay right here in the passenger side headlight cavity and with the long one we can go ahead and run that across our radiator core support and drop it down into the driver side headlight area. Now there's a shield here on top of the radiator that we can lift up and there's some factory wiring running behind that that's a great place to go ahead and drop this wiring or you can remove the shield altogether. There's just a couple clips holding it in place if you like. There's really no need to we can lift it up out of the way get plenty of access and we'll come back and we'll zip tie that wiring in place to keep it nice and factory looking. Next we can take the longer side of the lead with the ring terminal and the positive cable and we can fish it right alongside of this factory wiring running it up here alongside of our battery and next to our fuse box we can tuck it right under here underneath of the bolt securing the air intake and then just continue working the way back alongside the battery with the wiring. Now once we have the wiring fished back here next to our fuse box and our battery of course you have multiple routing options for running that wiring. I find the cleanest way to do it is simply by following all the factory wiring that's here already in place it's going to give it a nice clean professional look when you're done your wiring and it's going to keep it free from interfering with anything else under the hood. Now the ring terminal here on our black ground lead is going to attach right here to a grounding post that's in place from the factory you can simply use a 10 millimeter socket to remove that nut and install our ground lead right there. Now for the positive lead here we do have a couple options now you can use the accessory wiring if your Jeep had it present from the factory. Those four auxiliary switches on the dash the wiring is going to be present right here next to the battery. Of course you could connect that lead right here and then you would have manual control of your LED DRL trim rings however Oracle also supplies you with this little fuse tap here allowing us to tap into the factory fuse box for automatic control of those DRL trim rings meaning when we start the Jeep they're going to come on automatically without us having to activate any switch anywhere. So to use that we're going to go ahead and remove the lid from our fuse box here and this fuse tap is going to be installed into fuse slot F52 and that's found right here in the center of the box just to the side of these two relays and it's a 20 amp fuse here. That fuse spot happens to be for our cigarette lighter or auxiliary power port inside the Jeep and the reason we're tapping into that is because it's only powered when the Jeep is turned on giving us that automatic control of the wiring. Now with the wiring present as it is it's a little bit of a stretch to get it in here I have a routing that I really like running this wiring here behind the fuse box and following these factory connections here on the side of the fuse box up and over and then we can install this here into that fuse spot. Now by doing that the nice thing is that the lid has been designed to accommodate these connections on the side of the fuse panel meaning there's no chance that we're going to crimp our wiring here in the seal alongside the fuse box. We're not going to risk any water intrusion into here which is really nice so I'm going to go ahead and extend these wire leads I've got some simple wiring here it's 18 gauge red wiring to match that you can pick up at any local auto parts store. I'm going to be using a couple butt connectors just to extend this wiring slightly so I can get a really nice routing. As you can see that wire harness installs really easy basically just two connections we need to make at this point we're ready to go ahead and put the new Oculus headlights into place here in our core support. You can grab the one for the passenger side here with an R marked for the right side on the back side and as you can see the Oculus is a really nice unit that's not only really well designed on the front but they've even took into consideration on the back. It's a nice fully enclosed unit, it’s got these vent caps on the back there's a cap right here in the middle that we can take off and that's going to allow us to adjust and level the headlights once we have them installed. Now there are two connections we need to make. First one here is going to be for our DRL halo trim ring. Now there is a little notch on this that will align with the tab inside the wiring harness you can slide those together and then secure it with the little threaded collar and the next connection here is for our factory wire harness connection. Because they're using a nice factory style plug simply connect it right together make sure you hear that click and we can set the headlight back into the bucket using the alignment tabs to set it into place and we can re-secure it using those three 10-millimeter bolts that we removed from the factory headlights. Once we get the passenger side headlight in place we can go ahead and get the driver one in place. Now of course before we throw the grille back on the front of our Jeep it's a good idea to go ahead and test those headlights and make sure that the headlights work and also that that DRL halo trim ring works once you're satisfied with that we go ahead and reinstall our grille by aligning the tabs and simply pushing it into place. Of course the last step you might need to do is to go ahead and align your new Oculus headlights and Oracle does include the allen key you need. As I mentioned before there's that rubber cover on the back side giving you access to that alignment screw and the way you complete that alignment is by simply taking a tape measure and measuring from the ground to the center of your headlight and then on a wall about 25 feet in front of your Jeep you want to mark a line at the same height as the center line of your headlights and the lights should align just at or slightly below that line that you made on the wall so that you don't glare any oncoming traffic. That's all it takes to get your nine inch heated Oracle Oculus headlights installed in your Wrangler JL or Gladiator JT. That built-in temperature sensor will automatically turn on the heating function when the headlights are illuminated and the outside temperature approaches freezing as an added visual indicator a small amber LED at the six o'clock position will illuminate to let you know when the heating function is active. Those built-in temperature sensors will also regulate the heat level of the lens for peak performance, when they reach optimal temperature the heating function will automatically turn off and then cycle back on when the temperature drops low enough again. If you guys want to get more information or to purchase a set of heated Oracle Oculus headlights for your 2018 or newer Jeep Wrangler JL or 20 or newer Jeep Gladiator JT you can click that info button head over to Quadratec.com. Of course if you have any comments or questions about the headlights or how to get them installed in your Jeep you can always leave those for me down in the comments section below and as always if you haven't already and you like these videos do me a huge favor go and hit that thumbs up button, don't forget to hit that subscribe button as well as the notification icon so you’ll be sure to catch all our latest videos. Until next time I'm Rob I'll see you guys on the trail!
The Heated Oracle Oculus Bi-LED 9" Headlights have been designed specifically for the Jeep Wrangler JL and the Jeep Gladiator JT. The heated lens uses a built in temperature sensor to automatically activate the heating element in the lens to help melt away and prevent snow and ice from collecting on the headlight, ensuring you always have the maximum amount of light output from the Oculus Headlights. They feature a single center projector lens for the low beam and high beam that outputs 3200 lumens at 5500K for a crisp cool white light. There's also an LED DRL Halo ring to add a punch of style that's sure to turn heads. The lights are a plug and play design using a factory style connector for the low and high beams, and they include an easy to install wiring harness to power the LED DRL halos. Rob shows us just how easy it is to get them installed in your Jeep in this step-by-step installation video.
Shop Products in this video
4 results
Shop Brands in this video


Comments