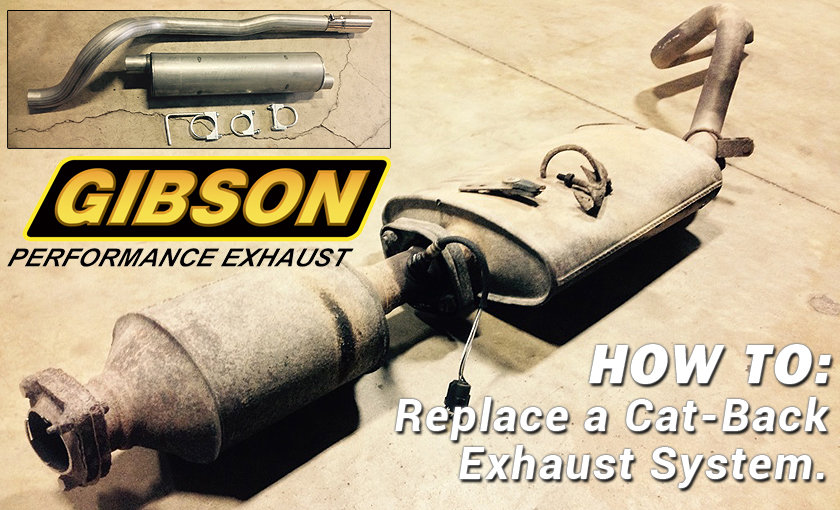
Gibson Performance Cat-Back Exhaust System Installation
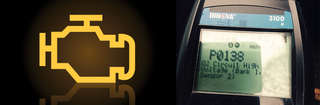
After 15+ years of hanging under your Jeep, your factory exhaust system may soon develop a need to be replaced due to wear, rust, abuse etc. In my case with my 2000 Jeep Cherokee, the muffler itself began to fail from rust. Cracks formed on the exterior metal casing and eventually corroded all the way through, leaving pieces of it to rattle or just fall off and sputter exhaust fumes from the gaps. I was also beginning to see an engine code pop up on my cluster gauge every now and then and it was related to the downstream oxygen (O2) sensor at the catalytic converter. I used the Innova CanOBD2® Diagnostic Tool to retrieve the exact code before blindly throwing parts at it. The code that came up was P0138: O2 Circuit High Voltage (Bank 1, Sensor 2), which usually means that the O2 sensor has reached the end of it's life. Considering I just passed 100K miles on the odometer, I'm fairly confident that the O2 sensor will also need replaced as they typically last for about 100K-150K miles. My Jeep was telling me it was time to address the exhaust system and get it taken care of before it gets worse.
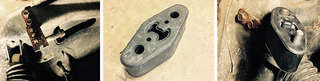
This 2000 Jeep Cherokee was equipped from the factory with a flange style muffler to catalytic converter pipe connection. After a closer look I quickly realized that unbolting any of these components and taking them apart was going to be next to impossible due to the amount of corrosion. The flange connection bolts resembled some really burnt brownies (more like lumps of rust rather than anything you could get a socket around). At this point it would be easiest to remove the original exhaust with a sawzall rather than fighting unbolting it carefully. Since there would be no salvaging anything from the factory catalytic converter to the tail pipe, I decided to replace both the catalytic converter and the rest from the cat-back (Muffler, tail pipe, hangers etc.).
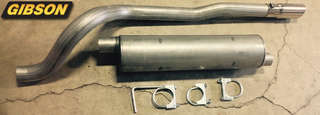
For this install I wanted to go with something mellow but also wanted a deeper, more pleasant tone to my exhaust, so after browsing Quadratec.com's Jeep Cherokee Exhaust Category, I decided to run the Gibson Performance Aluminized Steel (slip connection to converter) Cat-Back™ System accompanied by an new catalytic converter.
What you will Need
- Gibson Performance Aluminized Steel (slip connection to converter) Cat-Back™ System
- Rubber Exhaust Hanger/Insulator (optional if already equipped).
- Bosch Rear Exhaust Oxygen Sensor
- Direct Fit Catalytic Converter.
- Safety Glasses
- Mechanic Gloves
- Sawzall
- Paint Pen
- 3/8 Drive Ratchet Wrench.
- 1/2" Deep-well Socket
- 9/16" Deep-well Socket
- 14mm Socket
- 22mm O2 Sensor Socket
- Metal File
- Drop Light
- Pair of Jack Stands
- Penetrating Lubricant
- Anti-Seize
Exhaust Removal
Before installation you will need to remove the existing exhaust components and piping to make room for the new parts to be installed. Locate the parts being removed and figure out exactly where you need to start. In this application, as stated before, the corroded flange fitting bolts aren't even worth trying to loosen so plan on cutting the existing exhaust components out. (This will save you much time and aggravation). In this replacement install, both the catalytic converter and cat-back components will all be removed. With that in mind, locate the forward flange connection at the front of the catalytic converter where it mounts to the front pipe and proceed with the following steps:
1. Position jack stands under the components being removed (one under the muffler and the other directly under the tail pipe to catch the exhaust after it's been freed).
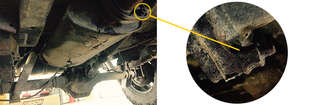
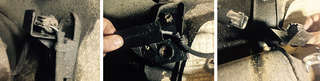
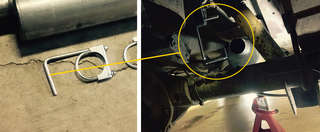
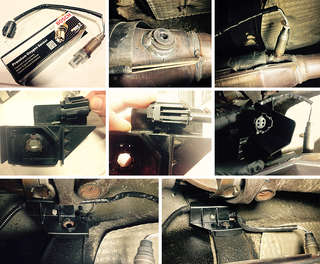
2. Locate the O2 Sensor threaded into the existing catalytic converter. Follow the wiring lead from the O2 Sensor to the body where it's mounted by a small plastic clip attached to the body with a 14mm bolt. At this point it's easiest to unbolt the plastic mount allowing the harness for the O2 Sensor to swing away from the body where you can see how to disconnect it without damaging the brittle plastic mounting components/clips. Once the wiring harness is disconnected from the main lead, now is a good time to attempt getting the O2 Sensor out of the catalytic converter. (You may not be able to salvage the O2 sensor depending on the condition of your vehicle.... I could not get the O2 sensor out in this case, so a new one will be needed to complete the install).
3. Cut the flange bolts off first to make room for a clean cut directly through the front pipe. Mark the front pipe with a paint pen as close to the flange as possible, keeping the line straight and clean to guide you. When cutting the flange at the front pipe, it's necessary to leave as much of the front pipe as possible so there is enough pipe to slip mount the new catalytic converter over. This is crucial as the front pipe begins to bend only inches from where you will need to cut, and you need a decent amount of straight piping to mate the new catalytic converter to.
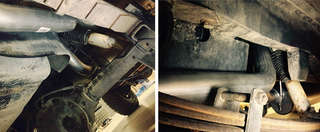
4. Locate the exhaust hanger directly behind the existing muffler, this too will be easier to cut off depending on what your Jeep Cherokee was equipped with from the factory (or if it's been "fixed" before by a previous owner using some other type of hanger system). In this case, it looks like this particular hanger was already altered and had some strapping welded to the actual hanger. As you can see in the picture, I cut the strapping as close to the original hanger mount as possible. After cutting out the strapping that was previously used, I found that I would need to purchase a replacement Rubber Exhaust Hanger/Insulator that would slide right over the body hanger providing a secure mount for the exhaust clamp hanger. This rubber insulator will also offer the exhaust system some cushion that will absorb shock from the rigors of daily driving. Now is a good time to press the rubber insulator over the body hanger to be used later in the installation.
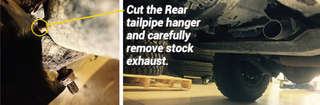
5. Move to the rear of the Jeep and locate the tail pipe hanger mounted between the passenger's side of the gas tank and passenger leaf spring. Again... just cut the old rusty clamp off with the sawzall (one cut should allow you to remove it). Now the factory exhaust components will be freed from the vehicle and resting on the jack stands. Carefully guide the old exhaust out from under the vehicle without getting it hung up on any axle vent tubes or brake lines etc.
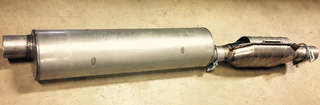
6. Now is a good time to dry fit all of the new exhaust components (catalytic converter, muffler, tail pipe) to make sure they fit together without any problems prior to installation. Once you test fit each piece and know that they will fit together smoothly, it's now time to move on to the installation.
Installation
Keep the jack stands handy to help support each of the new components while installing.
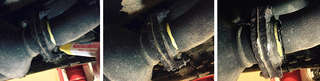
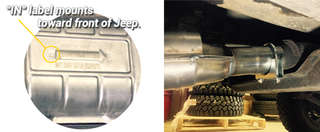
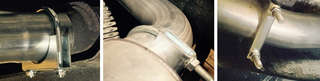
1. Start with the new direct fit catalytic converter, locate the inlet and outlet signified by a stamped arrow on the top of the cat. The side labeled "In" will be mounted toward the front of the Jeep and will slip over the front pipe that was cut during removal. The arrow should be pointing to the rear of the vehicle following the flow of the exhaust fumes from the engine to the tailpipe. Slide the front of the catalytic converter over the cut front pipe and support with jack stand while fitting the 2.5" pipe clamp over the mated piping. Do NOT fully tighten, just hand tighten the clamp until snug. (ONLY HAND TIGHTEN EACH CLAMP UNTIL EXHAUST IS ALL CONNECTED AND LINED UP PROPERLY).
2. Now the new Gibson muffler can be mated to the new catalytic converter. Just like the cat., the muffler will have an inlet and outlet, so it's very important to make sure you have it installed the right way—outlet toward the rear of the Jeep. Again, use a jack stand to support the muffler. Carefully slide the muffler inlet pipe over the outlet pipe of the catalytic converter. Now fit the provided Gibson 2 1/4" pipe clamp over the muffler/cat slip connection and hand tighten until snug.

3. Locate the Gibson 2 1/2" pipe clamp with the hanger attached to it. This will be used to support the rear of the muffler. Find the rubber insulator previously installed on the body hanger near the rear of the gas tank. Use the lower hole to slide the clamp-hanger through and let hang at the rear of the muffler. Leave the top section of the clamp uninstalled at this point so the tailpipe can rest on the hanger while being positioned. At this point, you will probably need to adjust the position of the muffler to get the outlet hole lined up with the hanger that was just installed. This can be accomplished by carefully twisting the muffler while still connected to the cat (this is why the clamps are only snug fit).
4. Grab a jack stand and keep it at the rear of the vehicle, you will need it to help support the tailpipe. Find the tailpipe and locate the extreme bend, this bend will be positioned over the rear axle allowing proper clearance from all other parts. Before mating the tailpipe to the outlet of the muffler, make sure the clamp-hanger is still in a good position. I found it easiest to feed the tailpipe in over the rear axle from behind the vehicle where there is room to see the outlet hole of the muffler. This will allow you to gently guide the tailpipe up over the rear axle to rest on the clamp-hanger that was installed in the previous step. Using the clamp-hanger to cradle the tailpipe, you can maneuver it to slip inside the outlet hole of the muffler. Once the tailpipe is mated to the muffler, grab the jack stand and prop up the end of the tailpipe, aligning it as close to the rear most hanger as possible. At this point you can now fit another 2 1/2" pipe clamp over the rear most hanger and tailpipe to keep it stable. Once stable, now go back to the clamp-hanger at the rear of the muffler to finish attaching the top of the clamp with the nuts and bolts hand tightened to a snug fit.
5. Now all of the new exhaust components are installed and all the clamps are snug fit, it's time to take a bright light and inspect each of the clamping points making sure that each clamp is in a good position to be tightened firmly making a closed seal. Start with the forward most clamp at the front of the catalytic converter, working your way to the rear of the vehicle. Make certain that each clamp along the way has enough pipe overlapping at the slip connections before beginning to tighten. Once each clamp is in a good position, start tightening at the forward most clamp and again work from front to rear. You will need a 9/16" and 1/2" deep-well sockets for the clamp nuts. Tighten each clamp so that it indents the metal enough to make a secure, tight fit. At this point the install is nearly complete.
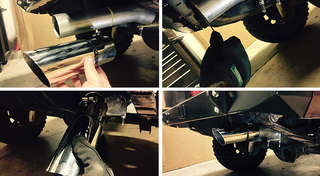
6. Once each clamp is secure, it's now time to install the nice, shiny, pretty stainless steal tip. In most cases you will be left with a good amount of pipe hanging out past your rear bumper. The excess piping will be simply cut off to desired length. Determine where you want the steel tip to end and mark the tailpipe accordingly. Cut marked line as straight as possible with a sawzall. Keep in mind you will need to leave enough tailpipe for the steel tip to slide over and securely clamp to. Once cut to desired length, clean up the course metal cut using your metal file. Finish by slipping the nice, pretty stainless steel tip over the nicely filed tailpipe and tighten using the supplied 1/2" bolt, lock washer and nut.
7. Lastly, the Oxygen Sensor will need to be reinstalled in the new catalytic converter. Grab the new Bosch O2 sensor from the box, remove the plastic cap from the threads and carefully thread into the new catalytic converter. Tighten until snug with a 22mm line wrench or O2 socket. Now grab the plastic mounting bracket that was removed in the first few steps. Use caution when reinstalling this bracket as it will most likely be brittle. First locate the plastic push clip on the back of the plastic mounting bracket. Now locate the plastic harness at the end of the new O2 sensor wiring. There is a grooved slot on the harness that will slide over the small plastic push clip (see pictures for detail). Once the wiring harness is attached to the push clip, plug the wiring lead from the vehicle side into the new O2 sensor harness and let hang. Next, bolt the plastic mounting bracket back onto the Jeep using a 14mm socket (hand thread until snug so you don't break the plastic mounting bracket).
Now the new Cat-Back Exhaust system and new catalytic converter are completely installed. If you have not yet cleared any codes from the computer, do so now before starting the vehicle so it will recognize the new O2 Sensor and adjust back to normal operating conditions. If you do not have a code reader, simply unbolt the negative battery terminal for a few minutes to get the computer to relearn the new O2 Sensor. After any codes have been cleared, it's now time to start up the engine and bask in the glory of a fresh, new, great sounding exhaust system with no more check engine light!