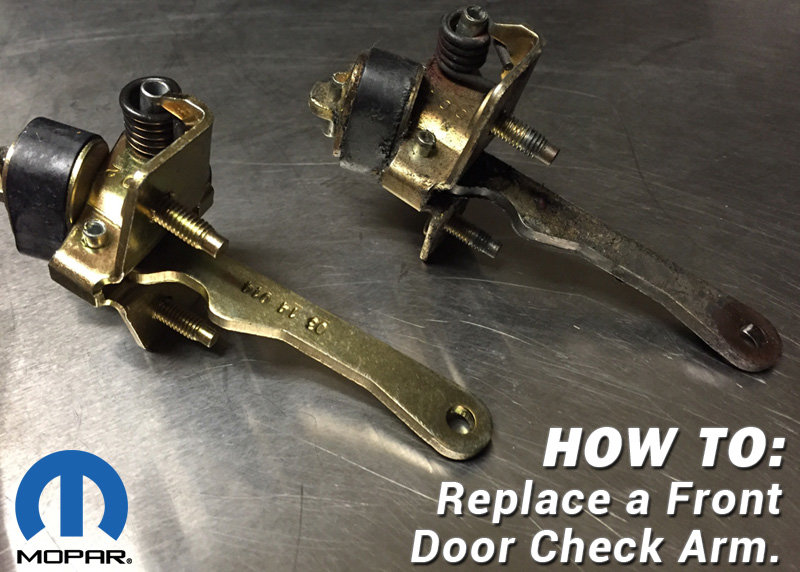
As the Jeep Cherokee XJ models grow a little long in the tooth, being out of production since 2001, they will eventually wear out certain parts... especially ones that are used the most. For instance, the driver's door check arm takes A LOT of abuse, continually being flung open several times a day with regular use. If you're an XJ owner, you can probably relate to the horrific sounds that a worn out door check arm can produce. Luckily, Quadratec carries all the necesasry replacement parts to make your old noisey, clunky, screachy door check arm assembly sound smooth and new again!
This article will cover the simple steps and tools required to remove and reinstall a front Driver's side door check arm assembly along with all related mounting hardware for the 1997-2001 model Jeep Cherokee XJ.
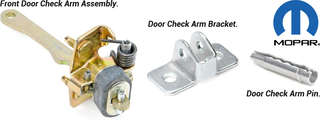
NOTE: Replace ALL 3 components at the same time, after years of use, the pin and bracket will be worn out as well and wobble around even after replacing the check arm. If all 3 components are not replaced, chances are you will still have a noisey door.
What You Will Need
- MOPAR Front Door Check Arm Assembly
- MOPAR Front Door Check Arm Bracket
- MOPAR Front Door Check Arm Pin
- MOPAR Touch Up Paint
- Primer
- Light Grit Sand Paper
- #2 & #3 Phillips Head Screw Driver or Screwgun
- 10mm Socket Wrench
- Needle Nose Pliers
- Sagety Glasses
- Plastic Panel Removal Tool
- Your Choice Penetrating Lubricant
- Anti-Seize Lubricant
Removal/Installation
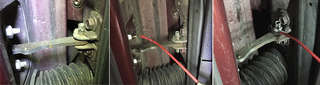
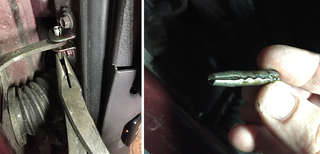
1. Start by opening the driver door, locate the check arm assembly and spray a small amount of penetrating lubricant on the 4 10mm bolts (two on the door side - two on the body side) and the retaining pin. Let the lubricant work in while you move on to the next step.
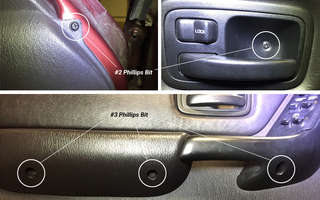
2. Locate and remove all 5 phillips head screws that hold the door panel onto the door. Start with the top right hand corner using a #2 phillips bit, then move to the door release handle trim bezel and remove that screw as well. Now using a #3 phillips bit, locate and remove the 3 in-line screws found under the armrest/pull handle on the door panel.
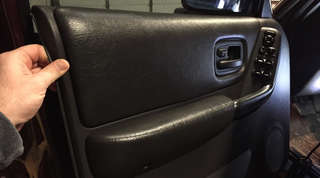
3. After all 5 screws are removed from the door panel, take your plastic panel removal tool and carefully wedge it inbetween the plastic door panel and the metal door body. Carefully work your panel tool around the panel from top left down around the bottom and up the right side only, gently prying out the plastic push clips one by one along the way (the top will just pull up with hands after panel is free).

4. After the door panel is freed, grab the left upper corner of the door panel and carefully pull straight up, lifting from left to right until door panel is completely out of the felt dew wipe channel (dew wipe channel should remain on metal door body - if it comes up with the door panel, simply remove it and clip it back into place). DO NOT try to remove the entie panel yet... there are still wiring harnesses and plastic retainer clamps that need to be removed next. It is okay to let the door panel hang by what's still connected.
5. Now that the door panel is able to swing out from the door body, locate the 2 plastic retaining clips attached to the door lock/open linkage rods. Grabbing the top linkage bar with your left hand, use your thumb to pry the clips off from the underside of the linkage bar. Start with the yellow (top) then remove the black (bottom) clip and swing them away from the bar. At this point if you grab both linkage bars in your left hand and squeeze them together while holding the door panel with your right hand, the two metal linkage bars will drop from their guide holes in the plastic hinge mechanism. Then the door panel will only be connected by the two wiring harnesses.

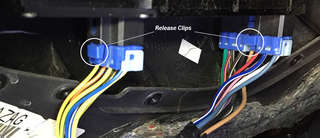
6. Now it's time to remove the wiring harnesses from the door panel. If you've never done this before, these two harnesses can be difficult to budge and feel like they won't disconnect... this is normal. Make sure you find and press the release clip on the blue wiring harness connectors while pulling straight out. Sometimes, if the harnesses are being difficult, gently rock the harness back and forth while pulling out away from the connection. ***DO NOT use a flat head screw driver to disconnect the harnesses—you WILL break them and be mad at yourself*** Store the plastic door panel in a safe place while you complete the rest of the job.
7. Now with the door panel removed and out of the way, remove the door speaker to make a hole for your arm to fit through.
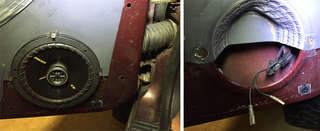
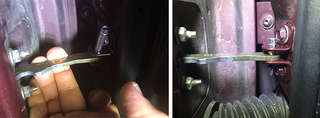
8. After the speaker is removed, go back to the check arm, locate the hinge pin and use a pair of pliers to sqeeze the tappered bottom of the pin and push the pin up out of the mounting bracket. Use caution during this step as the hing pin can fly out and go bye-bye (safety glasses are a good call for this step).
9. Using your 10mm socket wrench, unbolt the 2 nuts that hold the check arm to the door, then unbolt the 2 10mm screws at the mounting bracket on the body side and discard old mounting bracket. After check arm assembly is free, remove it by carefully reaching your arm through the hole in the speaker void. You may have to manouver some wirig inside the door to get the check arm assembly out.

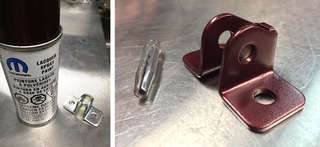
10. Now, with the check arm assembly and pin bracket removed, you can now compare all of your new parts with the old ones to assure they are the same. You'll notice that the new pin bracket is bare steel and will need primered and painted to avaoid oxidization, so grab your sand paper and lightly scuff the new pin bracket in preparation for paint. Make sure the new bracket is wiped clean with an alcohol wipe before primering. Once primed and dried, get your color-match touch up spray paint can and coat the new bracket with several light coats until completely covered, then allow time to cure before installing.
11. Now that the new components are all prepped, it's time to install them. Installation is simply the reverse of the removal process. Follow these steps in reverse order to complete the installation of your new MOPAR Door Check Arm Assembly, Hinge Pin and Mounting Bracket. Then once everything is back together, you can now enjoy a new, noise-free door opening process that will no longer make you cringe while entering or exiting your XJ!