Driving Characteristics?
If this is your first time driving with this type of differentuial, some differences will be noticed compared to driving with a standard differential.
Turning - Popping, snapping, and other types of metallic sound may be heard due to internal components dis-engaging and re-engaging. The transfer of torque from wheel to wheel may be noticeable in the steering controls while in 4 wheel drive (front wheels only).
Slippery Roads - Vehicles equipped with advanced locking and limited slip differentials are more sensitive to side slip. This means that the rear of the vehicle may slide out, or fish tail. Use caution when cornering and changing speed on slippery and/or unstable surfaces.
Full Locker In Front Axle? - This can be done easily. It works best if power transfer to the front drive can be disconnected. This can be achieved easiest by using manual locking hubs. The reason for this is to allow easier turning while on tarmac.Tire Pressure - Although difficult, a large difference in tire pressures between tires can cause a problem with the turning speeds of the tires. This can cause a unit to react as if a tire is losing traction, and can cause a premature lock up resulting in damage. It is a good idea to check tire pressures every few weeks.
Installation Test
| Step 1
With the engine turned off, raise the equipped driving axle(s) until the wheels are out of contact with the ground surface. Place the manual transmission in gear or the automatic transmission in park so that the drive-shaft is locked and does not rotate. Test for forward dis-engagement:
|
|
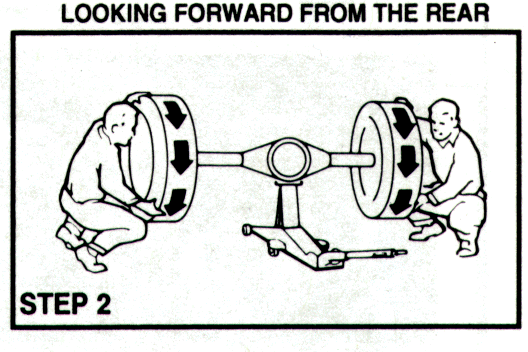
| Step 2
With two people, rotate both wheels rearward, as far as possible to lock both wheels
|
|
| Step 3
With the left wheel securely held in the rearward direction, rotate the right wheel slowly forward. A faint indexing or clicking sound should be heard as the differential disengages on the right side. |
|
|
Step 4
With the right wheel slowly rotating forward, the left wheel should be rotated slightly forward. This will lock both wheels. |
|
| Step 5
Again, rotate both wheels rearward, as far as possible to lock both wheels. |
|
| Step 6
With the right wheel securely held in the rearward direction, rotate the left wheel slowly forward. A faint indexing or clicking sound should be heard as the differential is disengaged on the left side. |
|
| Step 7
With the left wheel slowly rotating forward, the right wheel should be rotated slightly forward. This will lock both wheels. |
Repeat steps 2-7 except, test for reverse disengagement.
If the above steps are completed successfully and rotating wheels disengage easily by hand, rotate freely and evenly, lock both wheels when required, and produce a faint indexing or clicking sound, then the differential is properly installed and is functioning correctly.
If either wheel does not rotate freely in either direction or does not lock both wheels as required, re-check the installation of the differential. Also, check hand and foot brakes for possible drag caused by improper adjustment. Be sure that all thrust washers have been removed from the standard differential support case.
To check normal differential operation, drive the vehicle on a flat surface with good traction. In a right or left circle in forward and reverse to be sure that the outside wheel is free to overrun. A clicking or indexing sound may be heard. The sound of gear re-engagement may also be heard upon completion of the turn. This is normal.


