


An installation of a Posi-Lok to cure an ailing 4wd shifting problem in may YJ's and XJ's.

For '87-'95 Wrangler YJ and '84-'91 Cherokee XJ owners one consistent problem that occurs is the often failing vacuum motor, which engages 4wd. The vacuum motor falls subject to failure for one of many reasons. Usually the shifting diaphragm will become frozen and seize, the vacuum lines will crack and vacuum action is lost, or the vacuum solenoid will fail. Sometimes you can flex too much and pull the vacuum lines off of the motor itself. YJ's are different from their CJ predecessor, as well as the new '97-'02 TJ Wranglers and 91 and up XJ's, by having a two-piece axle shaft on the passenger side. Shifting into 4wd is done through the console shifter sending an impulse to the front motor via the vacuum lines. This moves the shift fork, engaging the collar over the two shafts allowing the vehicle to be in 4wd.
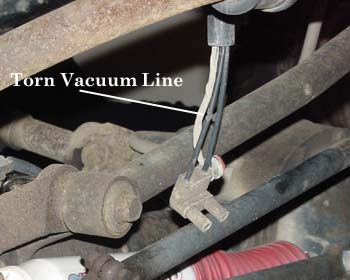 I decided to test my 4wd one day and the 4wd indicator light would not illuminate. I started checking things over to find out why. What I found was a vacuum harness cracked and split to the front axle shift motor. I was only able to have power to the rear wheels, rendering my front axle useless. At this point I basically was faced with two options. I could go to a Jeep dealer and get a new vacuum harness, but that would ultimately lead me down the same road that I am on now. My second option, to me, is the most sensible option. I went for the manual cable activated system known as 4x4 Posi-Lok. This complete kit replaces the factory vacuum shift motor with a manual shift motor that allows the driver to engage 4wd instantly.

To install a Posi-Lok system no special tools are required, and can be done by someone who has good working knowledge of Jeep mechanics. You will need a drill with a 5/16 inch and a 5/8 inch drill bit, RTV sealant, 10mm box wrench or ratchet, and a jack with stands to raise the vehicle. A set of jack stands is required for safety precautions. Included in the kit is a T-Handle shifter with actuator cable, shift fork housing & gasket, and all additional electrical wiring.
First, a good level and secure spot to work is essential. Next we jacked up the vehicle and removed the front passenger wheel and secured the Jeep on jack stands. The stands were placed directly behind the Main Eye hanger of the front suspension. Once the Jeep was secure, we began the installation.
Step One - T-Handle
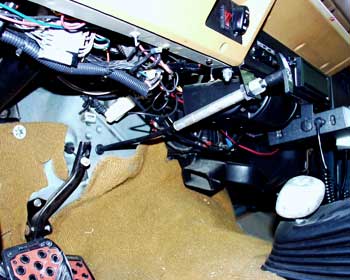
Locate where the T-Handle will be placed on the underside of your dashboard. We decided to place it underneath where the auxiliary light switch panel is on the dashboard, as this seemed to have the most support for the stress it would endure when being engaged. Then drill a 5/16 inch hole on the underside support for the dash (A) and install the bracket securely (B). With a straight edge, locate where the cable will go through the firewall and mark that spot. Be sure to clear any electrical obstructions before drilling through the firewall. Once you have located where the cable will go, drill a 5/8 inch hole and feed the cable through, making sure that there are no metal shavings left around the hole (C). There is a rubber grommet that fits in the opening to keep the cable secure and to prevent any chaffing from vibration. Once the cable is run through the firewall, it needs to be routed towards the front axle of the vehicle. Than it will need to be run to the shift motor from there. The important thing to remember is to not bind the cable by using too sharp of an angle. The cable needs to have a gentle arc to it so it will work smoothly.
 A
A .jpg) B
B .jpg) C
CStep Two - Removing the original shift motor
Before removing the four 10mm bolts, which hold the shift motor, it is a good idea to spray the bolts with a penetrating oil to loosen any rust that may have formed. I learned this the hard way by snapping two of the four bolts when trying to remove them. Penetrating oil should be sprayed generously about 24 hours before installation and intermittently after that till the time of install.
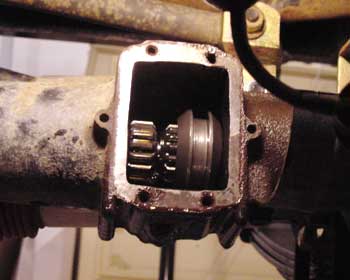
The vacuum lines that run to the top of the shift motor will need to be unplugged. Simply pull them off of the tips that stick out of the motor. Once disconnected, carefully remove the outer bolts of the motor housing. Keep in mind that gear oil will spill out of the housing once it is loosened and removed. A drip tray should be placed directly under the motor to keep the oil from spilling onto the ground. When the cover is off, make sure that all of the cork seal is removed from the axle housing before installing the Posi-Lok. Here, you can see where the two axle shafts meet to engage and disengage.
.jpg)
The shift fork that is in the old housing needs to be removed and re-used, or a new shift fork can to be purchased separately. For simplicity sake, I purchased a new one for a complete new parts installation.
Step Three - Assemble the new housing
The new shift fork needs to be located on the fork shaft that goes into the housing. The cable end also needs to be attached to the fork shaft at this point. See the installation Instructions for detailed assembly. With the unit assembled, it is ready to be installed onto the axle tubing. Looking into the opening on the axle tube, you will notice a collar that goes around the axle shaft. This is where the shifter fork connects. Simply slide the fork over that collar and snug the new housing with new gasket to the axle tube. Once in place, use the new hardware supplied to bolt the unit to the axle tubing. Install filler plug in the center of the new shifter housing.

.jpg)


Step Four - Making the electrical connections
This varies for different model years. I have a 1994 Wrangler, we found that it would be better to take the original wiring and snip the ends of the 2 wires, and making a new connection to the Posi-Lok terminal. These connections are for the Shift Indicator Light located on the dashboard.
Step Five - Vacuum line removal
Since the vacuum lines are not being used, they need to be removed from the vehicle. First, remove the vacuum line from the motor. Than remove vacuum line from the intake manifold. Here, you need to use the white plug "cap" that is supplied from Posi-Lok and place it where the line was on the top of the manifold. Once both ends are removed, the line needs to be disconnected from the Transfer Case, from there simply trace the line and remove it from the vehicle.
The installation is complete
All aspects of 4wd should be in total working order. Re-install the front tire and tighten lug nuts. Now it is time to test the Posi-Lok. Turn the ignition to the ON position and engage the 4wd lever. Now gently, but firmly pull the T-Handle of the Posi-Lok out about an inch and twist into the locking position. At this point the front passenger wheel should be engaged and the 4wd Indicator light should be illuminated. With the vehicle's front end still up on stands, check to see if the wheel is in-fact engaged. This will give you confirmation that the installation was a success.
Support the front differential with a floor jack and remove jack stands from under the frame. Lower the Jeep to the ground. At this point it is a good idea to re-check all connections and make sure all bolts are tight. Check your gear oil levels (depending on how much was lost during installation, level may be low). Finally read the Operating Instructions and put your new Posi-Lok to the test!
.jpg)

Article Type:
Product Installations
Category:
Driveline Tech