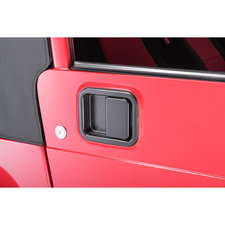
today in the Quadratec Academy we're replacing rusty and broken door handles in our 97-06 Jeep Wrangler TJ hey ROB here for Quadratec.com welcome to another edition of the Quadratec Academy where we cover everything from using common features and functions of your Jeep vehicle to wrenching on and maintaining your Jeep vehicle today we've got one of those how-to products for you that I hope will help a lot of you out there that own a 97-06 Jeep Wrangler TJ or even an 04-06 Jeep Wrangler LJ like we have in the shop here today now this Jeep happens to belong to one of our Quadratec employees Justin and as you can see well it's in overall fantastic shape aside from one little thing the door handles here on his full doors I haven't come across many older TJs or LJs for that matter that haven't suffered from this same very common problem the finish on these paddle handles starts to wear out they start to develop a lot of rust as the powder coat starts to flake away and frankly they start to get pretty sloppy and worn out now we can quickly fix that by installing a new set of paddle handles on the doors you can check out our available paddle handles here at quadrotortech.com by clicking on that info button we've got black replacements and even chrome replacements so you can either swap out what you've got from the factory with something new or replace it with a like paddle handle and by doing that you're not only going to get a nice new looking handle but one that's nice and tight with all new springs and mechanisms and even new weather seals there you're not going to need any specialized tools to do this job so most of you out there should be able to tackle this in just a short while right at home basically it involves removing the interior trim panel so that we can get access to the back side of this paddle handle to disconnect it remove it and swap it with the new one I've got our tools laid out on the cart here that we're going to need to do the job I've got a variety of different size flat head screwdrivers if you've got a nice long flathead screwdriver that's definitely going to make your job go a little bit easier a phillips head screwdriver a t10 torx driver a couple different picks will be helpful as well some needle nose pliers a hammer can be helpful during this job and then the two tools I have down the end aren't totally required but they'll definitely make it go a little bit smoother and a little bit quicker so I've got a nylon panel tool here that's going to be helpful at popping that interior trim panel off the door without damaging the plastic panel or marring the painted interior finish of your door and then this other tool I actually have here is a window crank removal tool now there is a small pin that locks the window crank in place on the mechanism that needs to be removed so that you can remove the handle this tool simply slips underneath of the window crank and pops that pin out for you nice and easy you can pick up one of these tools right here at Quadratec.com by clicking on that info button it's relatively inexpensive and as I mentioned it'll make your job go a whole lot faster not required however you can do that by simply sliding a flathead screwdriver or even a very small pair of needle nose pliers behind that window crank to pop that pin out of place now I do have a couple extra tools on the cart here with me Justin also mentioned that his door locks were starting to get a little bit sticky so this is the perfect time to address that as we have that interior panel off I've got some pb blaster and some wd-40 there we can freeze some of those mechanisms up a flashlight is helpful for peering inside of that door panel and of course a power driver is great to make the job go a little bit quicker if you've got one available now finally before we get started I do have one other thing on the cart here with me and that is some new door panel retainer clips now frankly even the newest TJ or LJ at this point is going to be over 15 years old and there's no way around it over time plastic gets brittle and it cracks when you go to pop that interior door panel off well the odds are pretty high that you're going to break some of those clips that hold the panel in place so do yourself a favor and go ahead and pick up a few extra of these panel retaining clips before you start the job so you're not stuck halfway through unable to put your door panel back on your door they only cost about a dollar a piece you're gonna need six of them per door if you've got them on hand again it's just gonna make your job go that much smoother so the first thing we need to do is to go ahead and open up our door so we can go ahead and get started by opening up the door and the first thing we need to do is to go ahead and remove our window crank you can go ahead and grab that window crank removal tool if you're using one and you'll simply slide it right behind the window crank in between the little foam seal back there and the crank itself the tool will kind of align itself right into place and as you push it should pop that retaining pin right out of the way now if you take a look at the back of the window crank here you see the pin that I'm talking about functions just like a small snap ring locks into place into a groove on the spline of the window crank mechanism you can use a small flat head screwdriver to pry that out but well you can see just how easy using that window crank removal tool is to quickly remove that handle next we need to go ahead and remove the five t10 torx fasteners we've got two located one on each side of the grab handle one just below the door latch and then two at the bottom of the door panel here underneath of the storage pocket now before we move on to the next step one of the things that I always like to do and I like to think helps make jobs like this go a whole lot faster and a lot smoother is to keep yourself nice and organized while you're working something like the s b silicone tool tray can do just that it's got these great individual pockets on here to help keep you organized so you know which fasteners need to go in which locations when you're putting everything back together now those fasteners that we actually just took out of our door panel are slightly different there's two different fasteners there so we've got two of those that actually came out of each side of the door handle and then the remaining three that came out of the exterior areas here on our door panel so we can keep those nice and organized this is also a great place to store things like our new door panel clips that we're going to be installing in just a moment so the next thing we can do is to go ahead and grab our nylon panel tool and we're going to be inserting that in between the plastic door panel and the metal door frame and what we're doing is popping these small clips out and remember since we're going to be replacing them if you snap or break any of them along the way that's okay of course they are made of plastic they're a few years old they're pROBably pretty brittle so the odds of breaking them are pretty high as you can see they simply function by compressing when you push them into the holes on the door frame and then they pop back out to retain that door panel into place so all we need to do is go ahead slide that panel tool in just work our way around
popping them out as we go
now before we pull that door panel off I'd like to have somewhere nice and protected to lay that down we're going to go ahead and start by lifting the panel away from the bottom of the door lift it at the rear edge of the door first and slide it away from the forward edge of the door it should pop right out of the window track and we can go ahead and lay our door panel upside down and we can see that well it looks like four of our retaining clips survived two of them broke we're just going to go ahead and replace all of them that way we've got brand new nice tight fitting panel retaining clips in place on our door panel to get those out we simply need to go ahead and push them out of the little retaining clips here on the back side of the door panel and then we can just go ahead and replace each one one by one with our brand new clips with those clips installed we can go ahead and set our door panel aside now the next step we have to do is remove this support brace inside for the grab handle that's held in place with four phillips head screws
this is also the perfect time to grab your window crank now we don't need to snap it back into place we're just going to slide it onto the mechanism and roll our window glass all the way up that way we have access to the back side of that paddle handle inside the door without the glass in our way then we can go ahead and peel back this protective weather barrier and the seal that's on here should be reusable it should remain pretty tacky when you peel it away and we don't need to completely remove this just need to peel it back enough that it'll be out of our way while we're working and we'll have access through this panel right here then we can go ahead and I like to disconnect this rod here that runs from our latch down to the door latch just to give us some better access to the back side of the paddle handle to remove it go ahead and use a small flat head screwdriver to kind of help apply some pressure to those retaining tabs on that plastic clip you just kind of twist the screwdriver a little bit you should be able to get that to pop right out by pushing it towards the outside of the door and we should be able to just kind of maneuver this plastic clip and rod to separate the two and we can just leave this rod loose at this point it's just going to give us a little more room to work inside the door next we need to remove the small cotter pin that holds one of the lock rods in place to the back side of the paddle handle the easiest way to do that is by slipping a pick down from the top in between the window opening of the door we can hook that cotter pin and then lift it right out next we can go ahead and slide that rod off the post of the paddle handle and then there should be a small washer in between the rod on that post that we can remove as well now at this point the only thing holding the paddle handle into the door are two gator pins one on each side of the paddle handle these work by slipping a pin in between the retaining clip on the paddle handle and the inside of the sheet metal of the door this is where that long handle screwdriver is going to come in handy you can reach up and I like to pry that retaining clip out of the way from the sawtooth edge of that gator pin with that out of the way we should now be able to pop that pin up out of place repeat that on the other side and then we can remove the handle from the door with the clips removed at this point we should be able to go ahead and simply pry the paddle handle away from the outside of our door now it may be slightly stuck over time that rubber weather seal just gets a little gummy and stuck so it may take a little pulling but you should be able to pop this right off the door
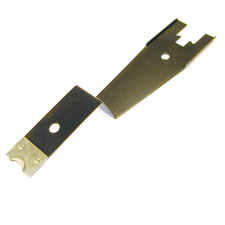
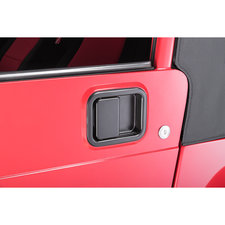
so now that I've got the paddle handle out of the door I thought I would just show you some of the common failure points on this by comparing it with one of the new paddle handles you can see of course oh the new one just obviously looks a whole lot better on the top side of our paddle handle you can see this is where we have the return spring and as is usually the case a lot of these just kind of rust and totally fall apart that's going to contribute to that really kind of loose feeling and the ability of that paddle to return into place after you open your door outside of that we also just have a lot of rust accumulating on that mechanism on the back side which again is not only going to contribute to that loose sloppy feel of the door but just difficult to open your door at times now before we install the new paddle handle into the door I wanted to show you and make it a little clear on how those gator clips retain the paddle handle in the door so if we turn it over and we look at the back side you'll see we have this retaining clip and this little spring clip here now that gator clip is going to simply slide down into place of course we've got this gasket on the outside of our door and then on the sheet metal this pin is going to sit against the inside sheet metal as we push it down into place it's kind of acts like a wedge and it's going to put tension against this little spring clip here which is going to latch into each of those teeth on that gator pin as we push it farther down it's going to compress and squeeze and pull that paddle handle locking it into place in our door so we can go ahead before I install this paddle handle I'm just going to clean up the outside painted surface a little bit we can drop the paddle handle into place sliding the latch mechanism towards the forward edge of the door first popping it into place at which point we can go ahead and install those two gator pins locking the mechanism into the door followed by reattaching that lock rod of course don't forget that washer first followed by the lock rod and the cotter pin to secure it in place with everything reconnected we can see that our paddle handle is functional again now as I mentioned earlier Justin also noted that his door locks were kind of frozen and they weren't really working properly this rod that we disconnected before we got started on this job is actually linked up to our lock mechanism on the inside handle and so before we connect that I've actually got the keys in the lock cylinder on the outside of the door and you can see that when I twist it well it's not actually moving our lock mechanism here it's just kind of bending that lock rod so the first thing we can do is go ahead and reconnect our interior lock rod
and just slide it back into place in that plastic clip okay and now we can go ahead and grab you can use some wd-40 or other lubricant but I like something nice and strong like a pb blaster to really get in here and help to free up any corrosion on any of these pivot points on the latch and lock mechanisms get everything lubricated nice and well and we can see get that lock mechanism moving again we're starting to get a little movement back in there you might just have to work on this for a couple minutes let that penetrating oil do its job get in there break free any corrosion
at this point you can see we've got that lock mechanism freed up nicely Justin can now lock his doors again at this point we can go ahead and re-secure that weather barrier and as I mentioned that seal should be pretty tacky should hold it in place while we get our door panel reinstalled then we can go ahead and reattach that handle support bracket with the four phillips head screws next we can grab the window crank and again just lower that glass back down inside of the door at this point we're ready to go ahead and reinstall our interior door panel and to do so we're going to line it up with the door lift the back edge of the panel higher the forward edge of the door down lower and it's helpful to kind of align the forward edge of the panel with this little triangle filler plate here we're going to get it nice and close to the door and this lip should drop right in place into the window gap here and then we should be able to slide the panel forward allowing the rest of it to drop into place
once it's aligned we should be able to push around the perimeter to lock those new panel clips in
and then we can go ahead and reinstall those three screws around the perimeter two under the storage pocket one here under the latch and the two screws one on each side of the grab handle now the last thing we have to reinstall to finish up our job is to put our window crank back on the door as you can see we've got that foam gasket and plastic washer which will go on first and I've already got the crank set up with the retaining clip just kind of set right on the edge of the crank here so when we slide this into place all we have to do is push that clip down and it's going to set into the groove on the mechanism here retaining our window crank in place go ahead pop the washer on first followed by the window crank now this can be positioned in any location on this crank it's not keyed in any way I just like to have both my driver and passenger doors match and right now the passenger was set up so that when my window is down the crank handle is pointed directly at the grab handle so we've got it lined up there we can go ahead and grab that window crank removal tool this time sliding it in from the opposite side and it should push that pin right back into place we heard a little clip there now we're going to go ahead and just push some pressure on the window crank and we'll hear one other click that's letting you know that the pin is now engaged on the mechanism and the window cranks not going to fall off
and with that that's all it takes to get your brand new paddle handles installed on your 97-06 Jeep Wrangler TJ or your 04-06 Jeep Wrangler unlimited LJ if you guys have any comments or questions at all about how to get your new door handles installed on your Wrangler you can always leave those for me down in the comment section below or contact us directly at any of the options on the screen and of course if you haven't already and you like these videos do me a huge favor make sure you hit that thumbs up button don't forget to hit that subscribe button as well as a notification icon so be sure to catch all of our future episodes right here from the Quadratec Academy as well as plenty more until next time I'm ROB I'll see you guys out on the trail
In this episode of the Quadratec Academy, Rob installs new full steel door paddle handles on a 2006 Jeep Wrangler TJ Unlimited. Chances are, if you've got an older Wrangler TJ or LJ, your door handles are probably starting to look faded & rusty and they may not even be working correctly any longer.
Over the years, moisture can get behind the factory paddle handle, corroding the return spring and mechanism. Eventually the spring will break, causing a "floppy" handle that doesn't spring closed after you open your door. Fortunately, there are plenty of options when it comes to replacement door handles. Getting the old handles swapped out for some new paddle handles is a pretty easy job that doesn't even require any specialized tools, just a bit of "know how" to get it done. In this video, Rob will show some tips and tricks to hopefully make the process of replacing your door handles easy!
Shop Products in this video
4 results

Shop Brands in this video


Comments