by Scott Ammerman
Quadratec Channel Correspondent
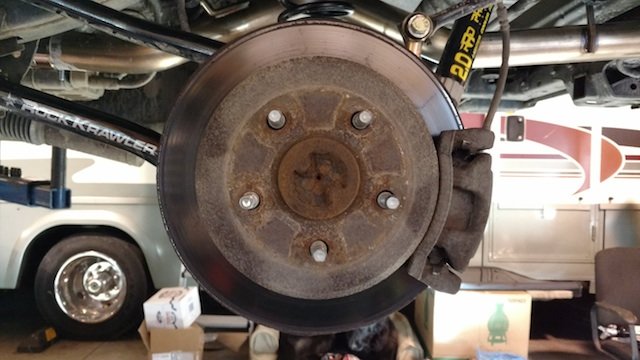
SINCE THE SUBSTANTIAL INCREASE in rolling mass created by upgrading to 35” tires on my Wrangler JK Rubicon, I’ve noticed a drastic difference in stopping distance. The factory brakes, and whatever “lifetime” super metallic brake pads the previous owner installed, aren’t really slowing my Jeep down to a stop as quickly as I would like.
When I first brought it home, I was plagued by a constant rotational squeak from the left rear, caused by pads not moving freely on the caliper bracket.
In addition, a steady vibration felt in the steering wheel when slowing from highway speeds, indicated warped front rotors at the very least. The factory pads produced a lot of dust, causing my front wheels to be covered in murky brown coating within a few days of a thorough cleaning. While Jeeps are absolutely made to get dirty, the front wheels constantly being several shades darker than the rear was somewhat maddening - and completely avoidable.
The vibration, noise and harshness made each application of the brakes a somewhat painful experience. Although this generation of Wrangler comes standard with 4-wheel discs, the worn-out rotors and pads were definitely in need of replacement.
Rather than going through a simple replacement of factory components, I opted to upgrade everything at the same time. As my Rubicon gains weight in the form of heavy steel armor, larger wheels and tires and other assorted components, its ability to haul that weight down to a dead stop should be increased as well.
As with anything Jeep related, there are a multitude of choices.
Better engineered rotors, superior pad compounds, and big brake kits that require larger rotors and specific wheel spacing just scratch the surface. Some of the big brake kits even require replacement of the master cylinder to keep the proper hydraulic proportioning between the axles. While these kits might work great for professional teams with seemingly unlimited budgets, the initial investment puts them past the range that most people are willing to spend.
So for this build, I’m exploring the options available to me without increasing the rotor size. This will mean that even for JKs with 17” factory equipment wheels, these same upgrades will work.
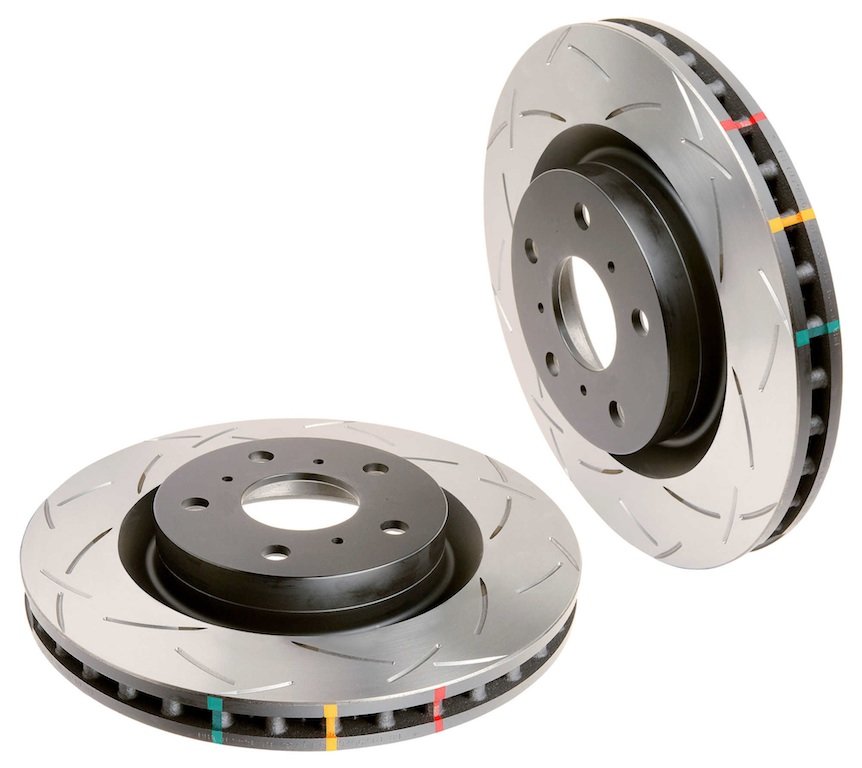
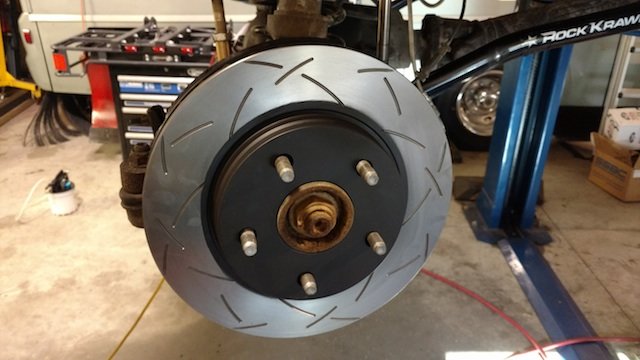
Disc Brakes Australia 4x4 Survival Series 4000 T3 RotorsThese rotors are serious braking equipment. I was looking for a slotted rotor, as I firmly believe in the advantages they provide versus a smooth faced one. To refer to these as “slotted rotors” does them an extreme disservice. Yes, they’re slotted - but not in the usual way. The tri-symmetrical curved slots in the T3 line dampen harmonics and noise traditionally associated with heavy braking with a slotted rotor.
It also allows gasses to more quickly escape from super-heated friction material in the pads. The curved edges allow for an increased number of slots, and are kinder to pads than their straight counterparts. The more slots you have, the faster they clear debris that reduces friction from the surface of the pads. Have you ever driven through dirt, mud or water in a harsh environment? I know I have. The curvature of the slots also allows the rotors to be used on either side, while many competitors’ high performance slotted designs are directional.
The non-frictional surfaces have a high temperature coating designed to inhibit corrosion and maintain their appearance. Even the high carbon alloyed iron DBA casts them from, is engineered for better heat absorption and dissipation.
You could stop there, and still have a really well-engineered rotor, but DBA didn’t.
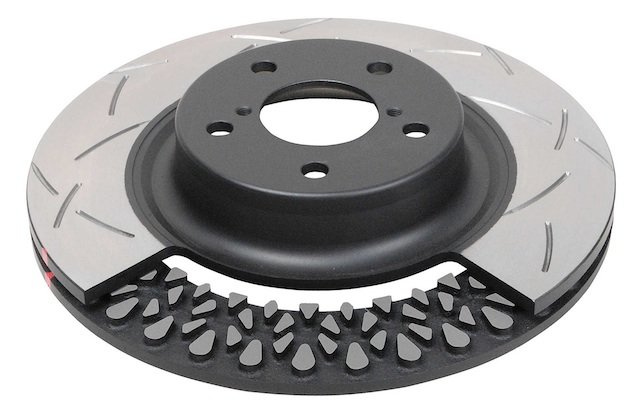
The next innovation DBA built into the front rotors is called the Kangaroo Paw Ventilation System. This unique design replaces the straight vanes found in conventionally-vented rotors with 144 diamond and teardrop pillars and columns.
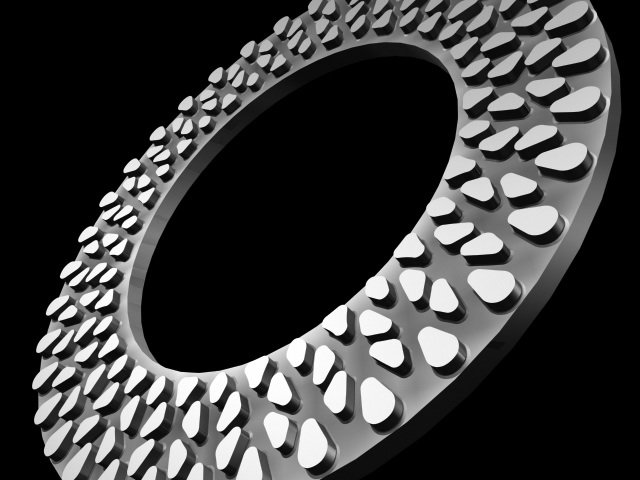
The advantage this provides to the strength of the entire rotor face is important, as is the increased surface area for cooling. The way these teardrops and pillars are engineered is essential - it slows the air down as it passes through to provide more effective heat dissipation. While I won’t be using these in a racing application, where brakes get hot and stay there, I will be doing a lot of mountain driving with a heavy vehicle. Therefore, I’ll take all the cooling capacity I can get. If my brakes do get incredibly hot, there are three thermographic paint stripes on the edges of the rotor that change color to indicate just how high the temperatures climbed. This can help you pick a better pad compound for your application if your first selection wasn’t up to the task.
Yes, “Kangaroo Paw Ventilation” is an interesting name. When you stop and think about it, have you ever seen a kangaroo with hot paws? I’m betting you have not. Sometimes the best designs come from nature.
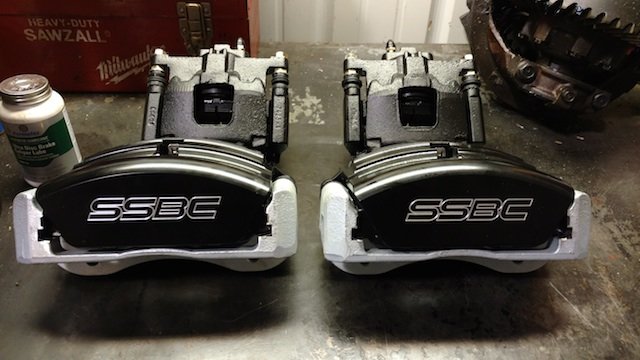
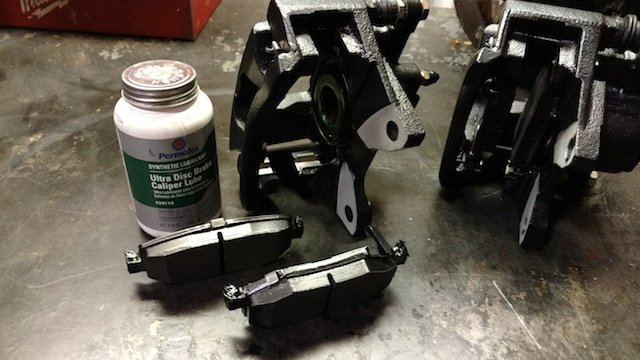
SSBC Front Quick Change Caliper KitThe standard JK front caliper is fairly large, but it only has a single piston. This causes engineering limitations in pad size - for the standard-weight Jeep, this may never become a serious issue. Stainless Steel Brake Corporation (SSBC) has found a way around this restriction with their Front Quick Change Caliper Kit. These calipers are available in powdercoated red or black, or a fully polished version. I considered the red ones for a while, but I really prefer the stealthy look of all black for this build.
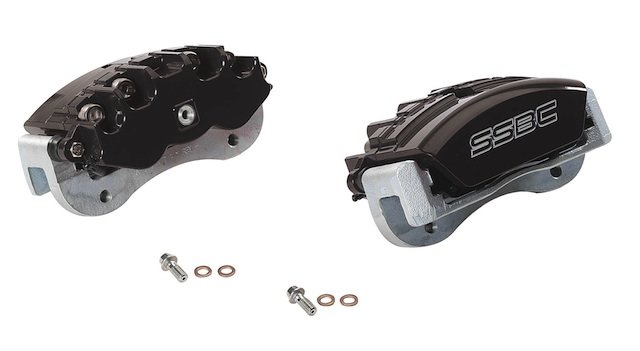
SSBC is family owned and operated in upstate New York, and has been coming up with better ways to stop vehicles since 1975. The company’s products are manufactured in the USA with high precision computer-aided machinery.
These calipers are brand new, and are not a mass-produced caliper taken from another automotive application like some competitors’ big brake kits.
This has several distinct advantages. With some other setups you are limited in rotor choices from the kit manufacturer, as the kits run a custom size. Additionally, Tri-Power calipers are double sealed against the elements; The SSBC design incorporates a square-cut pressure seal, and an additional internal dust seal, rather than a conventional single press-in unit. If you’re planning on driving in unforgiving environments, this will remarkably increase the caliper’s service life.
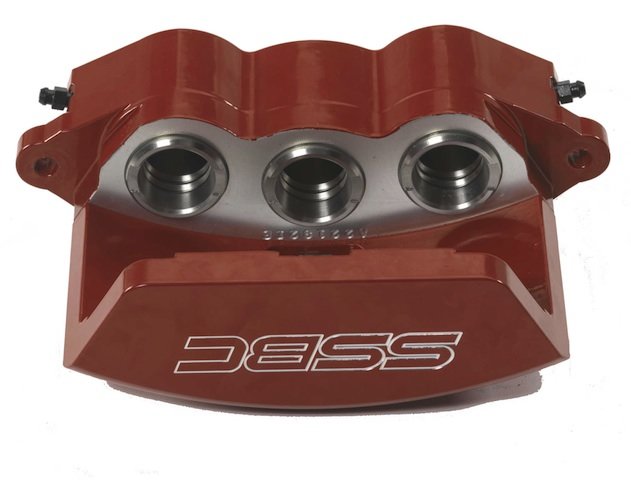
SSBC calipers are made from extruded aircraft aluminum, and feature three 45mm stainless steel pistons allowing for use of a much larger pad. This increases swept area on the rotor’s surface, and grants more clamping force to be applied with the same pedal effort. The finned aluminum housings also dissipate heat better than factory calipers, and only a slight trimming of the factory backing plate is required for installation. This design is so efficient that overall brake performance is increased remarkably without the need of a larger master cylinder. Each caliper features two Teflon-coated brake bleeders, so they can be used on either side. Should one bleeder fail, the calipers could be swapped from one side to the other without causing any issues.
They are designed to use factory-sized front rotors and wheels, so we won’t have any clearance issues. This setup is compatible with any banjo-style front brake hoses designed to work with the JK, so even longer braided stainless ones for modified suspensions will work.
The Quick Change Caliper Kit comes preloaded with performance brake pads. They use a C5 Corvette-style replacement pad if you need a different compound for your application, or need a fresh set on short notice. I upgraded these pads for this build, but more on that in the next section.
Hawk HPS Front and Rear Brake PadsThere is no substitute for the appropriate pad compound for your application. Unless your favorite brand is ‘Gimme the cheap stuff!’, you should give Hawk pads serious consideration. I’ve been using them in various applications for over a decade, and have been completely satisfied with the quality.
In addition to lasting longer than most budget-brand pads, they’re also far kinder to rotors. Noise is minimal with the HPS compound, and dust buildup is so light most times it's barely detectable. While ceramic pads would produce even less dust, they don’t dissipate heat quite as well as their ferro-carbon counterparts.
Ceramic compounds also do not have as much ‘cold bite’ when your brakes haven’t heated up to optimal operating temperature. When driving at lower speeds and only hitting the brakes occasionally, the surface temps stay very low. This will provide an added advantage while cold weather trail riding.
The HPS formula is a well-balanced friction material, and the price isn’t hurtful either. Quadratec also carries the Hawk LTS pads (for extreme duty) and the full ceramic pads for factory Jeep JK applications.
Additional maintenance items that will be handled now:
Brake fluid flush: Considering my Jeep’s brake fluid may not have been changed any time in recent history, this is a great time to tackle that as well. While driving in the mountains, the higher temperatures generated by dragging the brakes on descent, can boil brake fluid that has attracted too much moisture over time. This may cause pedal fade or even failure when you would least want it. While Jeep has no recommended service interval on replacement, a dark color in the fluid is a solid indicator of contamination. In addition, these contaminants can shorten the life of seals in the master cylinder, calipers and the ABS system. Of course, bleeding the brakes usually requires a second person, but I’ll be using a vacuum bleeder to speed things up. I’m also switching over to DOT 4 fluid in the process, so getting all the old stuff out is definitely a good idea.
Brake fluid reservoir replacement: The reservoir was badly discolored and had a lot of sediment collecting at the bottom. Replacement reservoirs cost a little more than a case of beer, and include a new sensor as well.
Parking brake overhaul: My parking brake barely holds on a hill. Replacing the rear rotors creates a really good time to check this item off my list.
Rear caliper replacement: The left rear caliper piston was starting to stick, and was resistant to being driven back in. While this would probably be okay in the short term, it most likely wouldn’t last through a full set of pads without issues. Since I had time to plan ahead, I sent the replacement factory style OMIX-ADA calipers out to be powdercoated in satin black at Shore Polishing and Powdercoating. They look better as a matching set, right? Not every upgrade has to be mechanical in nature.
Required tools and supplies:
- 21mm socket or wrench for front caliper mounting bolts
- 18mm socket or wrench for rear caliper mounting bolts
- 15mm wrench or socket for removing factory brake line banjo bolts
- 11mm socket for installing SSBC front banjo bolts
- 8mm wrench for SSBC front caliper bleeders
- 11mm wrench for factory bleeders on rear calipers
- A fluid catch pan for brake fluid
- 2 quarts of fresh, unopened brake fluid (for full flush)
- A second person to help bleed brakes (or a vacuum bleeder if you have no friends)
- A couple of cans of brake cleaner
- Penetrating oil, lots of it. More if you live in the winter salt states.
- A die grinder with a cut-off wheel and Scotch-Brite disc (or tin snips and a wire brush)
- A hammer big enough to beat heavy cast iron parts into submission
- A Performance Tool Brake Spoon for adjusting the parking brake shoes
- Performance Tool Brake Spring Pliers for dealing with springs
- A large c-clamp or pair of channel locks if not replacing the rear calipers (to press piston in)
- A pair of diagonal cutters
- A Performance Tool One Person Brake Bleeder Recovery Kit is recommended to save time, but not absolutely required
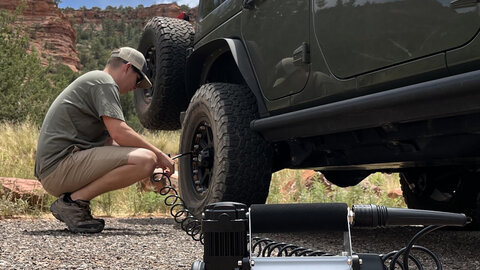
Front brake upgrade: Have your catch pan underneath the wheel you’re working on, as you’re about to lose a bunch of brake fluid. Try to avoid draining brake fluid on painted surfaces, but if it accidentally does then clean it off quickly. Brake fluid is also a skin and eye irritant, so you’ll want to wear some gloves for this step.
Start by removing your front brake hose bolt at the caliper using a 15mm wrench or socket. Pay attention to the orientation on the factory caliper, the fitting should point the same way on the new ones. The way the hose is twisted is also important, as it keeps the hose from rubbing the wheel and suspension when the wheels are turned. The caliper holds a substantial amount of fluid, so be ready. The two copper crush washers and banjo bolt will be replaced with ones included in the caliper hardware kit, so you may discard the original parts.
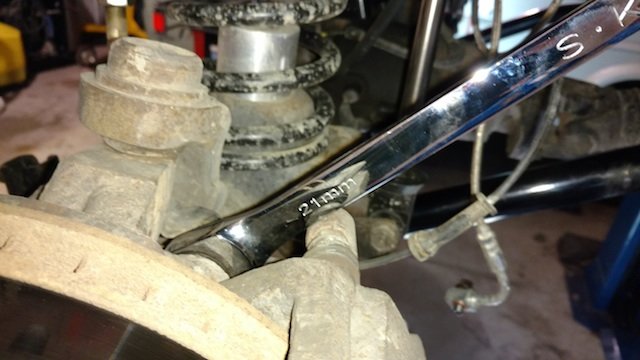
With that part removed, move on to the 21mm bolts holding the caliper carrier. We don’t need to drive the piston back in or remove the caliper from the carrier, so the whole caliper assembly can be removed. These bolts sometimes can be a bear to remove, so get yourself some good leverage. I bought a long-handled 21mm ratcheting box end wrench just for this application, but you can probably get an impact socket in there too. You can also add more leverage by “double wrenching” and using a second similarly sized wrench as pictured below.
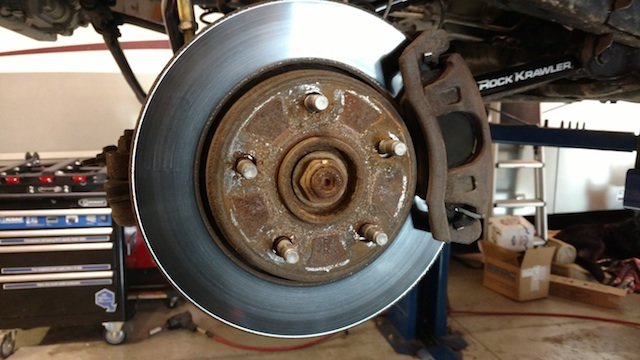
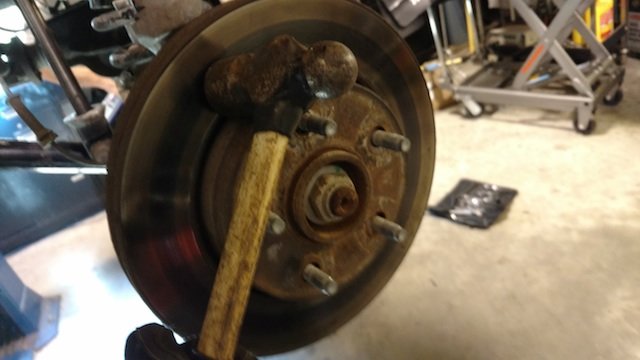
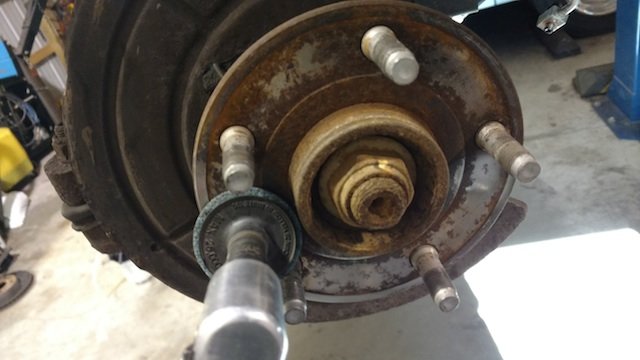
With the caliper and bracket removed, the rotor can be freed from the hub by hitting the surface of the disc with a hammer repeatedly, on all sides, to work it back and forth until it breaks free.
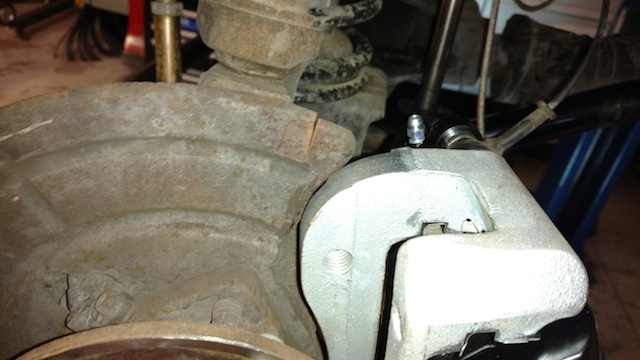
Hold the new SSBC caliper up to the mounting holes, and mark the caliper to splash shield overlap with a magic marker. Trim away the offensive edge of the shield using tin snips, a cut-off wheel, an angle grinder - or your teeth. It’s very thin metal, so cutting it is rather simple and not much needs to be removed. (Please don’t actually use your teeth!)
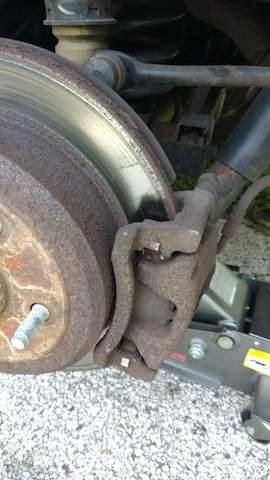
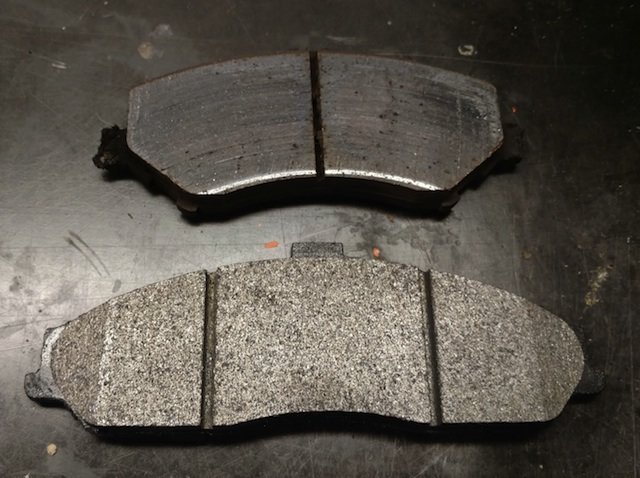
Just to give you an idea of the difference in friction material between the factory setup and the SSBC Tri-Power, here is what the pads look like side by side.
In addition, the front brake pads were not making complete contact and had a pretty severe stripe of discoloration across the friction surface of the rotor.
The rust scale on the hub needs to be dealt with before installing new rotors, as the uneven mating surface can cause brake pulsation. A wire brush is okay for this, but if you have a Scotch-Brite disc on an angle grinder, even better.
Wipe the friction surface of the rotor down with a clean cloth sprayed with brake cleaner, rather than spraying it liberally with the can. DBA recommends doing it this way so as not to damage the anti-corrosive coating on the rotor hat and edges with the nasty aerosol solvent.
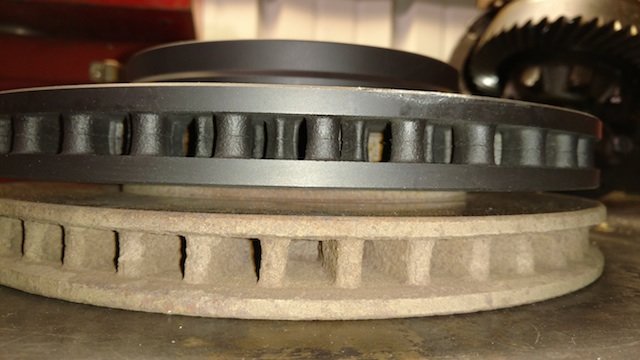
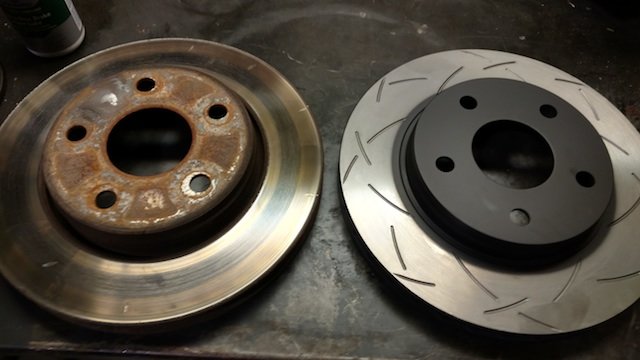
Looking at the vented edge of the rotors, you can clearly see the design difference. This added surface area is really going to improve heat dissipation.
Slide it on over the lug studs, and hand thread a couple of lug nuts on to hold it in place while you install the caliper. Check both bleeder screws on the caliper to make sure they are tight before you move on to the next step.
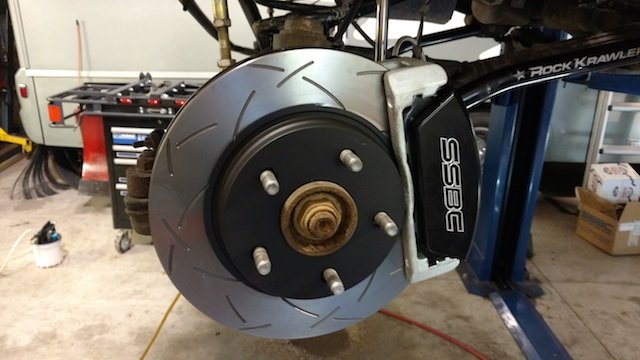
Hold the new SSBC caliper in place. Thread the caliper mounting bolts into the steering knuckle, then torque to 100 ft-lbs. Reinstall the brake hose banjo fitting as oriented in the original caliper, with the new bolt and crush washers (one on each side of the fitting) and torque to 20 ft-lbs. Repeat the procedure for the other side before moving on, and maybe take a few minutes to admire your handiwork before moving on to the rear brake replacement. Even though this was a conversion, the rear ones are going to be a good deal more frustrating.
Rear brake upgrade:
Since the rear calipers are being replaced for this upgrade, I don’t need to worry about driving the piston in or removing rust from the sliding surfaces of the caliper brackets. We did send them to Shore Polishing and Finishing in a disassembled state for coating, so they do need to be put back together and lubricated.
Similar to the front brakes, the rear caliper is held on with two 18mm bolts. Remove those and set the caliper out of the way so the hose isn’t being stretched. I usually hang it on the sway bar.
I hate disc over drum rear brakes. HATE. There was several times during this procedure that I said very awful things about the factory engineers that designed this setup. Of all the rear brakes I’ve replaced in my lifetime, these are my least favorite.
Integrated into the inboard side of the rear rotors, there is a small drum brake setup that is actuated by your parking brake cable when the lever is pulled. It consists of several springs, pins, clips and a set of shoes. The real problem lies in this little lever and actuator assembly, which is probably partially frozen if you’re lucky - and totally seized if you aren’t. If you live in a state that doesn’t spray salt water all over to prevent roads from freezing up, I envy you just a little bit during moments like this.
I didn’t order these parts with all the other “normal” service parts, as I was hoping they would be reusable. If I had it to do over again, I would have spent the extra money to get them. If your Jeep’s parking brake doesn’t work as well as it used to, a combination of corrosion and this unfortunate design are probably to blame.
Since I’m replacing the shoes, springs and rotors, there is almost no reason for me to be nice to any of the components when removing them. I’m going to want to hose everything down with penetrating oil, which would just about destroy the (probably original) brake shoe linings in the process. Everything is virtually the same color inside there, so I’m going to use the exploded diagram from the replacements part section of Quadratec’s site to describe what I’m doing.
There may be a few little locking rings on the wheel studs if your drum has never been removed. These can be removed with a screwdriver or needle nose pliers, and immediately thrown away.
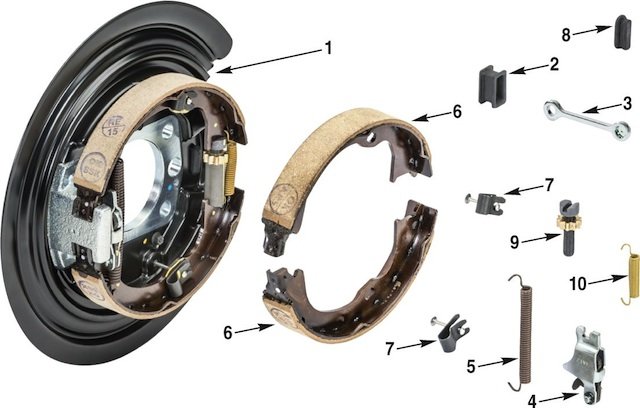
As with the fronts, the ring of the rotor can be seized to the hub. Your drums probably have a ridge worn into them as well, binding against the shoes. Remove the little rubber inspection hole plug (#8 on the picture) from the rear of the backing plate. If you can, turn the adjuster bolt star (#9 on the picture) to pull the shoes closer together. Mine was stuck firmly and not moving. With enough force, the shoes will pop out of place enough to slide the entire disc off.
Spray the center hub with penetrant, then go to town on the back of the rotor with the hammer. Remember, the straighter it is, the more likely it will be to slide off. Turn as you hit it with the hammer, and eventually it will come off. Then the fun begins!
The trouble with servicing drums is how hard they are to inspect before you start working. If you’re taking them apart and they weren’t working very well in the first place, at the very least you want a new set of shoes (#6) and springs for each side (2ea of #5 and #10) on hand. If they were totally ineffective, you should probably order the lever (#4) and actuator (#3) unless you want to deal with the removal and reconditioning of them. In the many times I’ve serviced parking brakes on a JK Wrangler, I have yet to find an actuator/lever assembly that worked well. You can get an idea of how stuck they are by having a friend pull the brake lever while you look at how the ends of the cables (part #3) sticks through grommet #2 to the outside of the backing plate. If they don’t move, just order them to be on the safe side. I don’t think you’ll want to pull the drums off again just to replace those parts, and there’s a lot to be said for a stout parking brake.
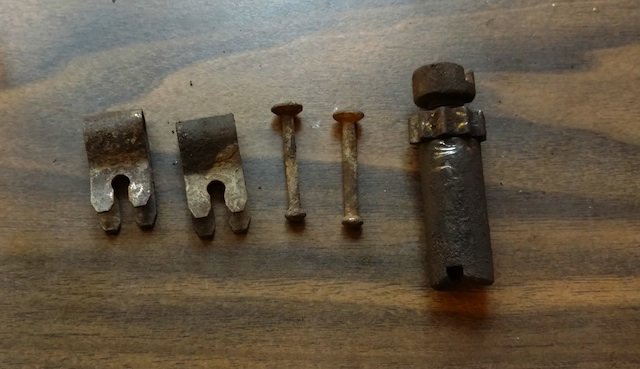
First, remove the brake shoe hold down springs with the handle end of the Brake Spring Pliers. If you’re replacing the coiled springs, cut them all with some diagonal cutters. There may be a second #5 spring on the back side of the shoes that was installed from the factory, but they aren’t really necessary for operation. They also can’t be replaced by normal means without pulling the axles out, so they rarely get changed out during normal brake service. Trust me, everything operates just fine without it. Everything will just fall apart after those are removed, but make sure you save the lever assembly plus all of these parts in the below image for reuse.
If the star nut on the adjuster doesn’t move freely, clean it up with a wire wheel and penetrating oil until it does. It needs to be adjusted all the way in so you can install new parts, so it has to be close to perfect.
Now, on to freeing up that lever. You can try spraying it with penetrating oil with everything apart and freeing it up, but remember that it needs to pivot at two points; the center pin of the lever assembly, and where the actuator contacts the lever. It’s hard to see in there, so have a bright light handy. I was able to free one up, and had to pull the second one. It looks like this out of the assembly:
If it is completely frozen and you opted to replace it, you can make your life easier by cutting the actuator and pulling it out. The rubber pass through boot (#2 on the above picture) will also have to be removed to give you a little more room. This is one of those projects requiring three hands, an assortment of tools and a lot of patience. I’m sure everyone who lives in a state free of road salt, and has serviced their parking brake, is laughing at this portion of the article by now- all these tiny metal moving parts are not very corrosion resistant. Installing a new lever assembly in two pieces is still a little frustrating, but not as bad as an old one. Be mindful of the orientation arrow on the body of the lever.
With the levers freed up, reinstall all the new parts like the exploded view picture shows. The easiest way I found was to install the #7 retention springs and shoes first, then the #10 short spring (with adjuster assembly), followed by the #5 spring last. The Performance Tool Brake Spring Pliers are the real heroes here, as that long spring is a real jerk, and if you miss the top hole as you’re stretching it, you get to pick up parts off the floor and go back a few steps. Do as Disc Brakes Australia recommends, and wipe down that rotor with a cloth and brake cleaner.
After assembling, making sure everything is centered here, is key. It may take a few tries to get the rotor on, so just shuffle everything around until it slides on freely. Move the adjuster star nut until the rotor doesn’t rotate freely anymore, and then back it off a little. Put the #8 plug back in place to keep your drums from filling with water during your off-road adventures.
If you’re just replacing pads and not the whole caliper, drive the piston back into the caliper body and load the bracket with your new pads. I am replacing the caliper, so I get to bleed the brakes in a few minutes instead of that step. Install the caliper and torque the 18mm mounting bolts to 100 ft-lbs.
Brake flush and bleeding:
Since I opened the entire system up at all the wheels, I need to get all the air out of the lines. As I said earlier, the brake fluid reservoir was contaminated and discolored enough to warrant replacement, so I used the vacuum bleeder to suck the remaining reservoir fluid out and installed a new one.
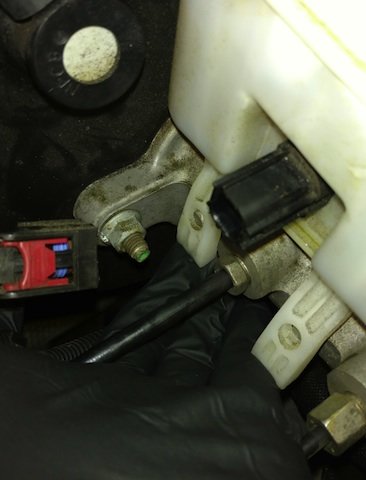
Start by sliding the red plastic tab rearward on the brake level sensor connector, and unplug it. The reservoir is held on by four tabs clipped down over metal pins, so pry these tabs up and pull straight up on the reservoir. It should pop right out of the rubber seals on the top of the master cylinder, and the new unit pushes right down in its place. If all your bleeders are closed and there was still fluid in the reservoir, the master cylinder wasn’t dry - so this way bench bleeding will not be necessary.
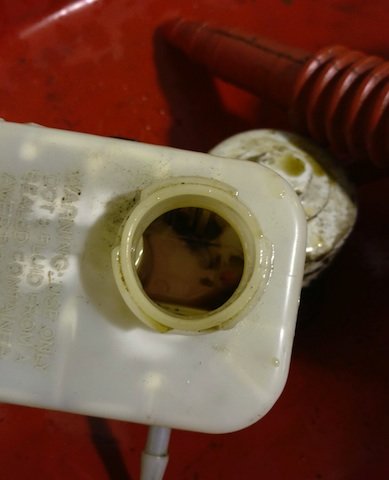
With all that junk in the old reservoir, you can see why I replaced it. It could have been removed and cleaned, but with all new calipers and fresh fluid it made sense to complete the project.
Fill the reservoir with DOT 4 brake fluid. This level needs to be closely monitored throughout the bleeding process - if the reservoir goes dry and air gets trapped in the master cylinder, you’re in for a lot more work. Keep it at least one-third of the way full at all times. While your Jeep owner’s manual specifies DOT 3 or 4 brake fluid, SSBC requires only DOT 4 for these calipers.
SSBC recommends gravity bleeding for the front calipers, so if that’s all you are replacing, you can do that to purge air from the front lines. For this you will need a Performance Tool One Person Brake Bleeder Recovery Kit, or another similar tool to see the fluid as it comes through a hose. All you need to do here is attach the hose, and open the top bleeders (not the bottom ones, since there are two per caliper) one caliper at a time, starting with the passenger side. Observe the fluid coming out of the bleeder through the hose for several minutes, until a clear stream of fluid is observed with no air bubbles. Once this happens, top the reservoir off and start your Jeep, then pump the brake pedal. If the pressure builds without fade, you’re done. If not, give it another try with the gravity bleed and try again.
Since I replaced all four, I attacked the entire system with a vacuum bleeder - this way, the fluid was sucked through the lines through the bleeder, air and all, into a container. I could watch the fluid coming through the tube and shut it when no bubbles were observed. The first few seconds of each corner was nearly black, before the clear started rolling through.
Test the brake pedal as before, with the engine running. If it feels firm and normal, you can road test and start the brake bedding procedure.
From SSBC’s instructions:
- 1. Perform a series of ten stops from 60 to 15mph. Don't let the vehicle come to a 100% stop. This can cause uneven pad material transfer to the rotor causing excessive vibration!
- 2. When performing the stops, the brakes should be between 50-60%. Pedal effort should be 50-60% of full brake lockup.
- 3. These series of stops should be performed in succession allowing slight cooling time for brakes between stops. This is to ensure that the brakes will reach sufficient temperature to drive out the bonding resins in the pads. Make sure the rotors and pads do not cool excessively between stops.
- 4. Let the brakes cool to ambient temperature.
- 5. Perform another ten 60-to-15 mph stops to complete the pad bed in following steps 1 thru 4 listed above.
- 6. Even after completing the bed in procedure, it is necessary to complete 200-250 miles of easy driving before full break in is complete.
Thoughts on this upgrade after a few thousand miles:
I completed this installation in early November, and have subjected this conversion to around 2700 miles of driving in mixed environments. This includes three trail days, and on each of those the brakes were fully submerged in mixes of mud, water, coal silt and ice on several occasions.
Once everything was broken in, I performed a panic stop test with the brakes heated up from stop-and-go driving I had performed before any of the work was done. The difference of before and after, from 60-to-0 miles per hour, on the same closed street was 27 feet. That’s a remarkable improvement; when you stand on the brakes during a hard stop it really hauls it down to zero like a much lighter vehicle.
I have removed all four calipers to check for even pad contact on both sides, as well as rotor integrity - everything is perfect. The rotors are not blued or spotted from uneven heat, and I haven’t heard a whisper of brake noise. Dust accumulation from the Hawk HPS pads is minimal, as expected.
The thermographic paint stripes on the Disc Brakes Australia Series 4000 T3 Rotors have not changed color (this indicates everything is working perfectly!), despite my repeated attempts to superheat the brakes on winding mountain roads in Pennsylvania’s Pocono Mountains. No pedal fade was experienced at all, and stopping distances were still exceptional during these tests.
While rock crawling, the clamping force of the brakes when descending obstacles was remarkably improved. While this is primarily due to the increased pad area afforded by the SSBC Tri-Power Calipers, every element of this braking system is working in perfect harmony.