If you are in need of a new Drive Shaft for your Jeep, it can be very costly to purchase a brand new fully assembled Drive Shaft. In this case, a new front CV Drive Shaft for a 2000 Jeep Cherokee XJ would cost $629.99 plus taxes! While this would be the easiest way to fix a worn-out drive shaft that's causing severe driveline vibrations, spending over $600 is not always in the budget. Luckily, Quadratec stocks a majority of common Jeep drive shaft rebuild components so that you can rebuild your worn-out drive shaft for A LOT less and save your hard-earned money for other cooler modifications! So let's get started.
In this particular situation, I recently replaced all 3 of the front Dana 30 Double Cardan CV Drive Shaft U-Joints that can be found in the following link.
(3) Dana Spicer® Spicer Life 1310 Drive Shaft U-Joints (NON-Greaseable). Quadratec Part# 52302.100X.A $34.99 each
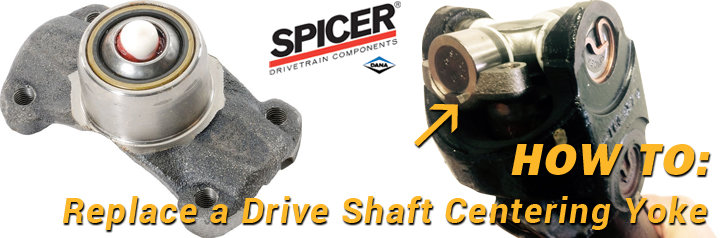
U-Joints are the weak links in drive shafts and replacing them usually fixes unwanted vibrations, however after replacing all 3 in this application, I was still experiencing some vibrations at certain speeds, leaving me to believe that the drive shaft Centering Yoke was also worn out. The following process will explain how to replace the Centering Yoke, which cradles the outer U-Joint from inside the double cardan end of the drive shaft.
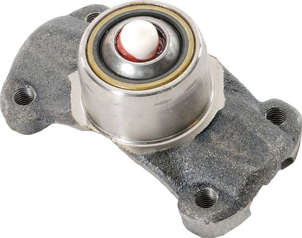
(1) Dana Spicer® CV 1310 Centering Yoke (NON-Greasable). Quadratec Part# 52302.1103 $69.99
Whenever rebuilding a drive shaft it's EXTREMELY important to mark the position of the drive shaft components in relation to one another before taking it apart. This is vital because the drive shaft is harmonically balanced and needs to be reassembled exactly as it was prior to rebuilding to maintain that balance. Otherwise you may still have vibrations after putting all new parts in, then having to take it to a shop to have it balanced again. (Even though I'm only taking apart one side, it's still good practice to mark the positions of each component in case you find other problems and have to tear down more than anticipated).
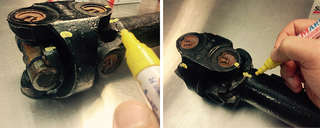
After marking the correct positions of all drive shaft components, it's now time to start disassembly by removing the retainer clips from the U-Joint caps so that the U-Joint can be pressed out. In this case I will be starting at the double cardan joint to expose the Centering Yoke. (Note that only the 1 outer U-Joint needs removed in order to replace the Centering Yoke). Spray the -U-Joint caps & clips with your choice of penetrating lubricant to help them come out easier.
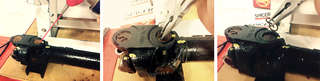
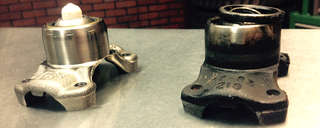
Once the retainer clips are out, we can now utilize a shop press to press out the outer U-Joint from it's seat in the H-Yoke, exposing the Centering Yoke for removal. Having a press is extremely helpful for this. After the outer U-Joint is removed from the H-Yoke, I can now remove the Centering Yoke and inspect it for problems. The Centering Yoke should lift out of it's seat with ease. Sometimes a small pry bar or flat head screw driver will come in handy if it's being difficult. In this case, you can see that the Centering Yoke basically just fell out, which is a good sign that it was in fact worn-out.
Now that the Centering Yoke is out, I can take a closer look and really inspect this part for wear. At this point with the brand new Centering Yoke sitting right next to the existing Centering Yoke, I can cealry see that the inner centering ball and seal ring that are supposed to be tightly pressed into the Centering Yoke literally fell out. Now I know for certain that this was the source of remaining driveline vibrations.
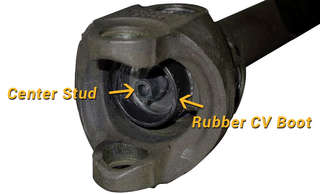
Now it's time to clean off any grease, dirt and debris from the rubber CV Boot at the Center Stud end of the drive shaft where the Centering Yoke was removed from. At this point it's also a good idea to inspect the rubber CV Boot that surrounds the socket portion of the Centering Yoke for tears, splits or damage. The rubber CV Boot helps keep grease in the Centering Yoke while keeping dirt and debris out. In this case the rubber CV Boot was still in good shape so I can now move on to installing the brand new CV Centering Yoke. Installation is simply reversing the removal process while paying close attention to making sure these parts go back together without getting anything jammed up. The first thing you will want to do is locate the Socket Spring inside the new Centering Yoke, which is usually protected by a cardboard sleeve or in this case a white rubber cap. ***Make sure you look inside the protective rubber cap as the Socket Spring sometimes gets stuck inside***.
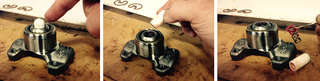
Once the Socket Spring is located, simply drop the spring inside the Center Stud located on the CV Drive Shaft stud end. Once you have the Socket Spring in place inside the Center Stud, you can now carefully seat the new Centering Yoke down over the Center Stud, making sure the void in the Center Ball slides over the Center Stud and Socket Spring.
Once you have the new Centering Yoke seated into place, you should be able to press down on the Centering Yoke to feel a slight resistance from the Socket Spring. It's important that you press down on the Centering Yoke to test and make sure the Socket Spring is actively pushing the Centering Yoke outward. When testing this, you will feel the Centering Yoke depress slightly about an 1/8th inch then raise back up when released. ***Do NOT continue the rest of the installation without testing for spring movement or you will have to do this all over again in a few miles***.
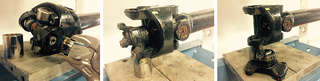
Once the Socket Spring and new Centering Yoke are properly seated in place, it's now time to continue installing the new outer U-joint. Again, using a shop press, you will now be able to install the outer U-Joint back into place between the H-yoke and new Centering Yoke. Begin by carefully removing two adjacent caps from the new U-Joint. Carefully, slip the capless ends of the new U-Joint into the cap holes on the H-Yoke. At the same time, you will align the two capped ends of the new U-Joint into their seat on the new centering yoke. Once the new U-Joint is in place and seated on the Centering Yoke, it's now time to press the caps back into the H-Yoke holes over the U-Joint ends on each side. Be careful when starting the caps into the H-Yoke. There are a few things to watch out for during this part of the process. First you will notice that the Centering Yoke is pushing outward on the new U-joint causing the capless ends of the U-Joint to be off center within the holes in the H-Yoke. To center up the U-joint within the H-Yoke, simply depress the Centering Yoke by pressing down on the center of the new outer U-joint. Keeping pressure on the U-Joint/Centering Yoke, carefully insert both U-joint caps making sure the needle bearings inside the caps don't get jammed up! Once each cap is pressed into the H-Yoke by hand far enough that the caps won't fall out, test that the U-joint rotates smoothly before pressing the caps on the rest of the way. This will help ensure that the needle bearings inside the caps are properly algined. When you are confident that the U-joint is rotating smoothly, it's now time to finish pressing the caps in using the shop press. Gently press the caps into their seats in the H-Yoke just enought to be able to get the new retainer clips into their slots on the H-Yoke, which is important to ensure the U-Joint caps do not work their way out while in use on the vehicle.

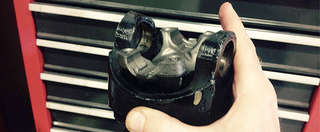
Once the clips are both installed, it's now time to take the rebuilt drive shaft back to it's home on the 2000 Jeep Cherokee XJ Dana 30 front axle assembly to again test drive for any vibrations. Upon a quick test drive, I was able to immediately notice the lack of any driveline vibrations and at this point have successfully rebuilt an old worn-out drive shaft and restored it to it's working condition, gaining strength and longevity while losing unwanted vibrations while driving. It's like driving a new vehicle!