Featuring Premium Parts from
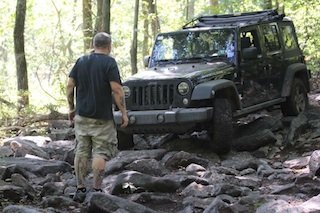
Several months ago, I purchased a 2008 Jeep Unlimited Rubicon with the intention of building it up into a rock crawling machine. In completely stock form, the 42RLE automatic transmission can get quite hot in this vehicle - this same unit was also used in other Jeep and Chrysler models, including the most catastrophic example: the Jeep Liberty. With the less adequate cooling in the Liberty, these transmissions experienced a much higher failure rate than should be expected during normal highway driving. A recall was issued in 2010 for many models (including mine) to add an additional “HOTOIL” warning in the gauge panel through module coding to indicate an unsafe operating temperature.

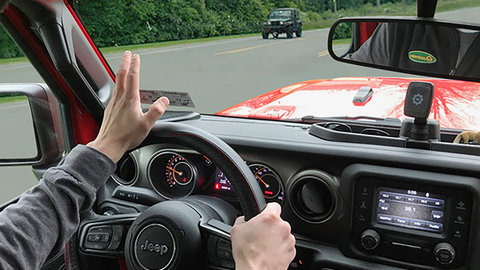
While checking the ATF operating temperature during normal driving conditions with a Superchips Trail Dash, the factory temperature sensor regularly read close to 200 degrees Fahrenheit in stop-and-go traffic. At higher speeds, the temperature does drop as more air flows through the radiator - but during a recent rafting trip to West Virginia, the temperature shot above 225 degrees for several minutes while slowly driving up mountain switchbacks, even though it was only 70 degrees outside. So it’s not hard to see what low speed, high load conditions experienced in trail crawling could do - particularly in the hot summer months. The eventual addition of off-road bumpers and armor will only serve to make this condition worse. While the actual ‘unsafe temperature range’ is something worth arguing about in the world of internet forums, I think everyone will agree that cooler overall temperatures can prolong transmission internal component life. At sustained temperatures above 220 degrees, the ATF+4 starts to break down at a much higher rate.

Auxiliary external coolers are typically recommended if you’re going to be doing any towing with your truck or Jeep, but the additional heat dissipation provided by one will also yield benefits in this application. This model made by Flex-a-Lite is specifically designed to work with Jeep JK automatics, but other direct fit Translife kits are also available through Quadratec for other models. A low cost, coatable stone guard is also available for this unit.

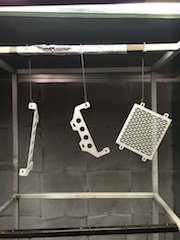
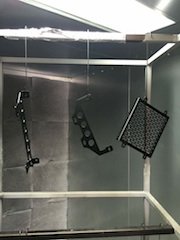
Since a hailstorm of small stones will no doubt bombard this unit at highway speeds, I opted to powder coat the stone guard and mounting brackets. A rattle can paint finish wouldn’t hold up nearly as well in the long term, and I wanted to make the complete cooler installation look less obvious. The three parts were sent to Shore Polishing and Finishing in Toms River, NJ for a quick media blast and matte black finish.
If you’re local, give them a try. Even if you aren’t, Shore Polishing and Finishing accepts shipped parts for coating. If you don’t have a high quality source in your area for this type of service, check them out and see what they can do for you.
Turnaround time was about a week, and for $60 you can’t beat the results. This durable powder coated finish will look great for years to come.
All parts required for installation are provided, and only a drill and some other common tools (aside from a really specific drill bit) are required to complete this project. Since my transmission has never had a fluid and filter service, I will also be covering the steps required to perform this important procedure in an article very soon.
List of tools needed for installation:
- Drill with #1 (.228”) bit- this size is essential, make sure you have it!
- Double flare tool for metal lines (auto parts stores rent these, or you can buy them for $25 or so)
- Mini tubing cutter
- Emery cloth for cleaning up the lines before flaring
- 10mm socket
- 11mm socket
- 11mm wrench
- #2 Phillips head screwdriver or trim tool for removing your grille (depends on hardware)
- A hose cutter, utility knife or large cutting pliers to cut cooler hose
- A marker or paint pen to mark where cooler mounting holes are to be drilled
- 1 quart of ATF +4
- A long funnel for adding transmission fluid
Procedure:
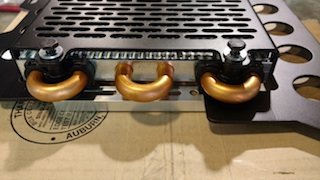
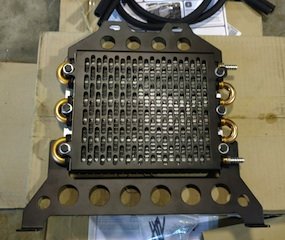
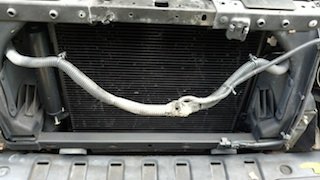
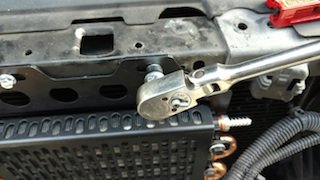
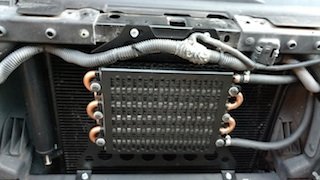
Assemble the transmission cooler as pictured using the supplied Gator Clips, 11mm bolts, nuts and washers around the upper and lower tubes, with the feet of the lower bracket facing towards you and the cooler fittings facing right. I added additional Gator Clips included in the Oil Cooler Guard kit on the middle tubes, but these aren’t actually necessary for mounting.
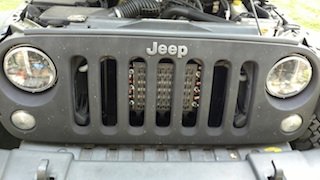
First, remove the front grille. Remove all eight fasteners across the top of the grille with a trim tool or a Phillips head screwdriver (depending on which type you have).
Take the turn signal bulb and sockets out of the signal by reaching in the wheel wells on either side and giving them a quarter turn to pop them free. The grille is still held on by several trim clips across the lower length, and two right near the headlights. Pulling it towards you is usually enough to pop this free - sometimes the lower one across the square metal beam can rust into place, but you can free them with a pry bar or flathead screwdriver if needed.
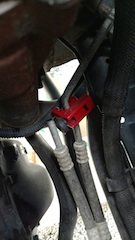
With the grille out of the way, loosen the upper wiring harness by pulling out the lower mounting ties with a trim tool or by brute force. The upper ties may be cut and removed, as the cooler bracket will block their installation holes.
Note: For this next step, a #1 drill bit is actually required. I thought I had every size, but this one is only included in a “wire gauge” or “numbered” drill bit set. You can buy them online, or at a place like Harbor Freight. Since the included self-tapping screws are fine pitched and you’re drilling into thin metal, a precise tolerance is required. Believe me, I wish it wasn’t. Luckily, I have a friendly neighbor with just about every automotive tool you could imagine, so I got off easy.
Set the cooler assembly in place, center it, and mark where your holes are to be drilled. Using that #1 drill bit, drill holes in the upper grille support and lower crossbar. Set the cooler back in place and tighten mounting bolts with a 10mm socket. These will be cutting threads in the metal as they tighten in, so make sure they’re straight. They are slotted for a flathead screwdriver as well, but I found a socket to be an easier way to cut the threads.
Note: From this step forward, you have a choice. This cooler can be used as a bypass cooler eliminating the factory cooler in the bottom of the A/C condenser entirely, and that is how the provided instructions are written. If you cut both lines as indicated, you will have to flare a lot more connections if you want to run this as an auxiliary cooler in tandem with the factory one. For the sake of science, I tried installing it this way first. I found it to be more efficient than the factory cooler by approximately 20% based on the factory temperature sensor readings, but temperatures during extreme use were still going over 200 degrees. After speaking with Flex-a-lite tech support, we changed the setup to run as an auxiliary cooler. Had this been the plan during the original installation, only the return line would have needed to be cut and flared. In my pictures, you’ll see I cut both lines and flared them on the transmission side. While this was the way the instructions recommended, for best performance it should be used as an auxiliary in line after the factory cooler. In any event, it will save you work. Everybody wins. Just remember to ignore both the instructions AND my pictures with both lines cut, and everything will work more efficiently.
![]()
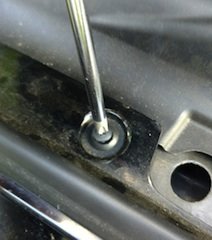
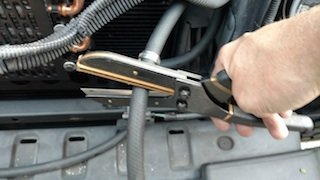
These are the lines we’re working with. The top one as it crosses over the axle is the return line. You should decide where to cut it based on the type of flaring tool you’re using.
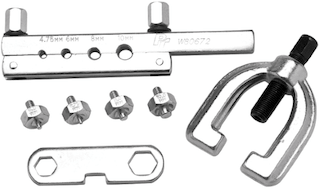
This is a standard flaring set made by Performance Tool, and is similar to the ones you can usually rent at an auto parts chain. Pay attention to how much clearance your tool needs to work, as well as how much line needs to be inserted into the clamp. Cutting right near a bend may back you into a corner quite literally. If you remove a section of line completely, you might want to try a practice flare out of the engine bay so you can get a feel for it.
We cut mine just after the flexible section because the hydraulic flaring tool we used was around 24” long, and designed to flare lines not yet installed in vehicles. While this precision (read: expensive) tool is certainly not needed for what we’re doing, it did make the job fairly simple.
All you need to do is add a smooth little barb to the end of the line so that a hose clamp can hold a hose on it without slipping off. If you’re using a basic flaring tool, you may want to cut the flexible section out and flare both sides, as the provided Flex-a-lite hoses will give you all the flex you need.
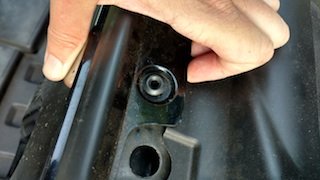
Cut the line with the tubing cutter, turning the wheel until it is tight before every few rotations. These are designed to make a clean cut without crushing the line or leaving metal shards everywhere, so they’re ideal for this process. Clean up the last inch or so of line with the emery cloth (flaring tools require a tight grip on the line to work) and flare both sides.

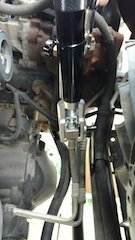
This is the shape you’re going for and again, this doesn’t need to be precise. You only need a small barb with no rough edges. A small amount of ATF in the end of the line should make it easy to slide right on. Slip a hose clamp onto each line and slide it up a bit (I usually forget this, but it makes it much easier before you put them on the fittings), then push the lines on your new flared ends. Run both hoses through the gap around the radiator, avoiding sharp edges. Make sure you know which is which, the one coming from the factory cooler line should go to the top fitting, and the return line back to the transmission connects to the lower one. When you know about how much length you need, cut the excess off, add a hose clamp, and slide them on the cooler fittings.
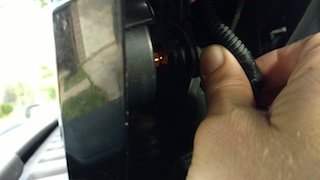
Tighten all 4 hose clamps, start the Jeep, and check for leaks.
If you don’t find any leaks, use the provided cable ties to reaffix the wiring loom above the cooler, and secure the new cooler lines in the engine compartment. Reinstall your grille, and don’t forget to plug those turn signals back into the sockets!
Since we’ve added a little more volume to the transmission fluid capacity, you need to check the level after driving about 15 miles. Check it with the engine running, and fill at the dipstick tube up to the point between the ‘hot’ marks.
Also, some people may be quick to tell you ‘you don’t want it to run too cool, that’s worse than it running a little hot!’ For this installation, it isn’t a concern. Temperatures get up into the operating range as normal, but don’t go much above 185 degrees for very long during mixed driving. With the cooler installed as a bypass, it did momentarily go above 200 degrees while trail crawling at Rausch Creek Off-Road Park in Pennsylvania on a mild day. With it used now as an auxiliary, those high temperatures should be a thing of the past.